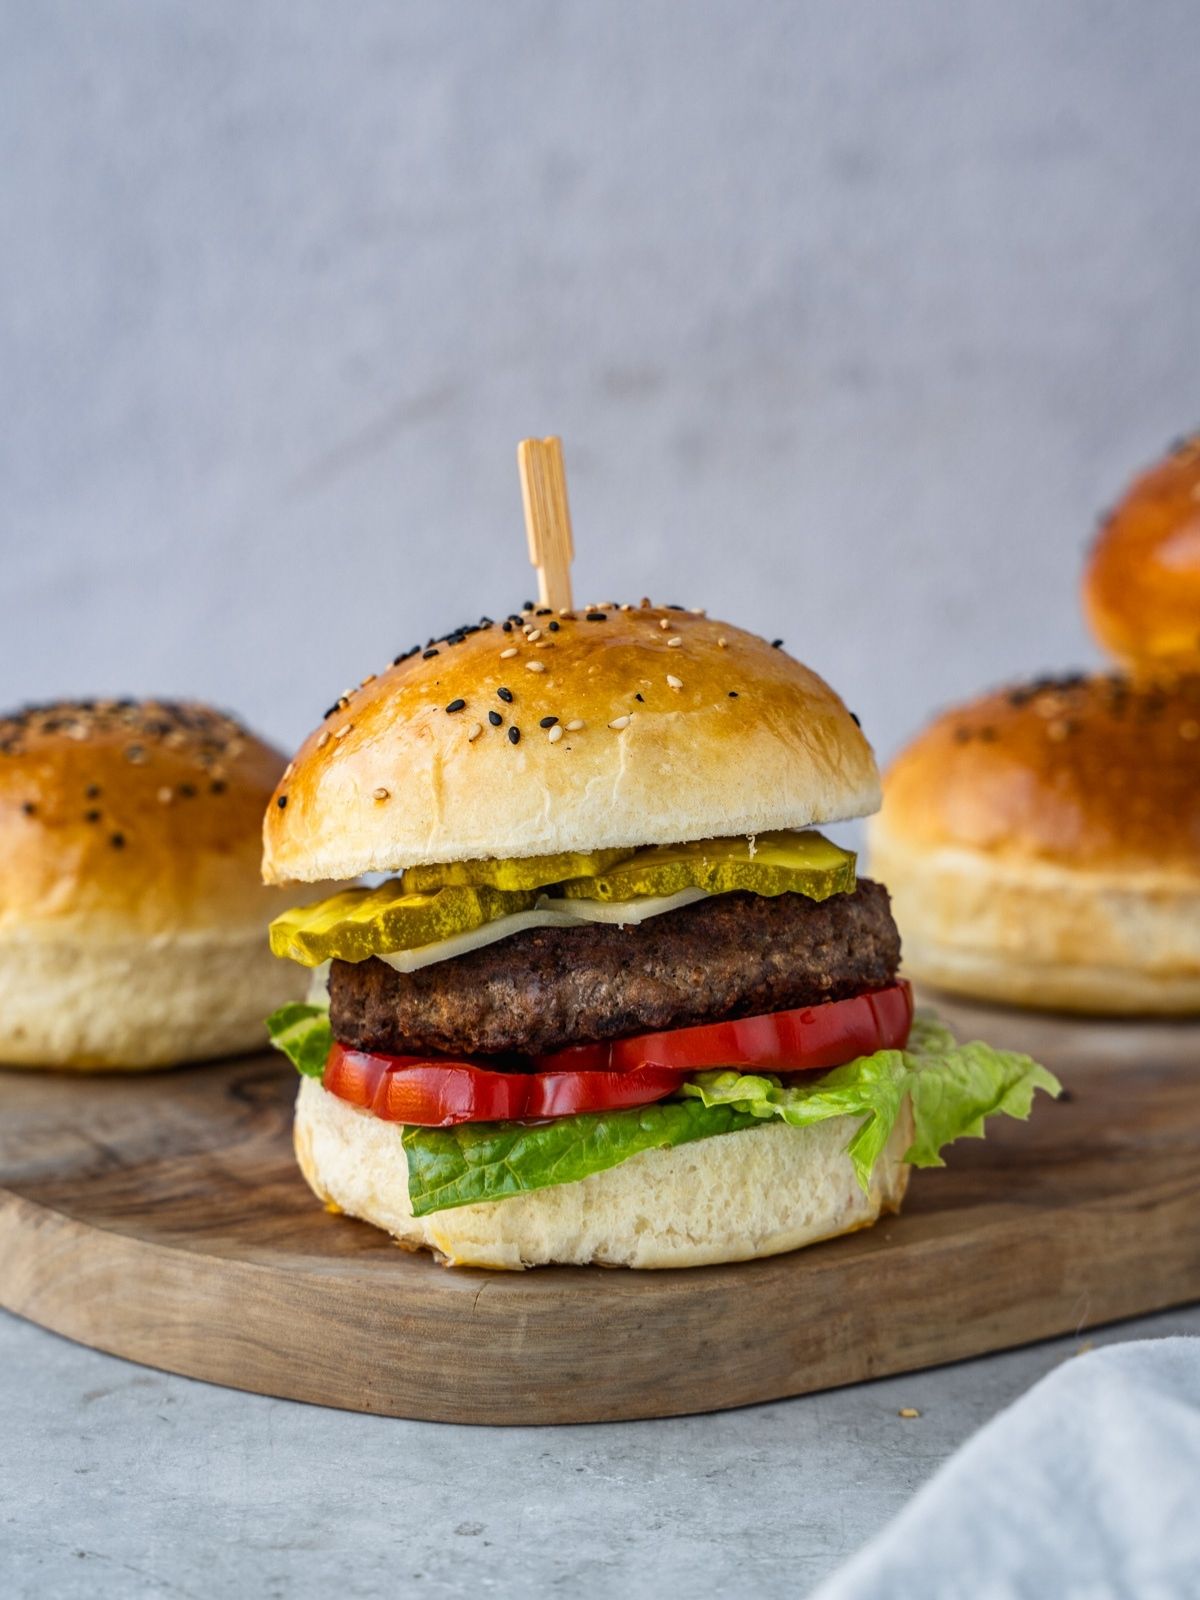
These Homemade Hamburger Buns come out soft, fluffy, golden on top, and slightly sweet. The recipe is straightforward and comes together in about 3 hours. Once you make these, you’ll never go back to store-bought buns! Plus, I included a trick to make sure they come out perfect every time.
This recipe is adapted from my base Dinner Rolls recipe. Use the buns to make your favorite hamburger, fried chicken sandwich or pulled pork sandwich. Perfect for grilling season.
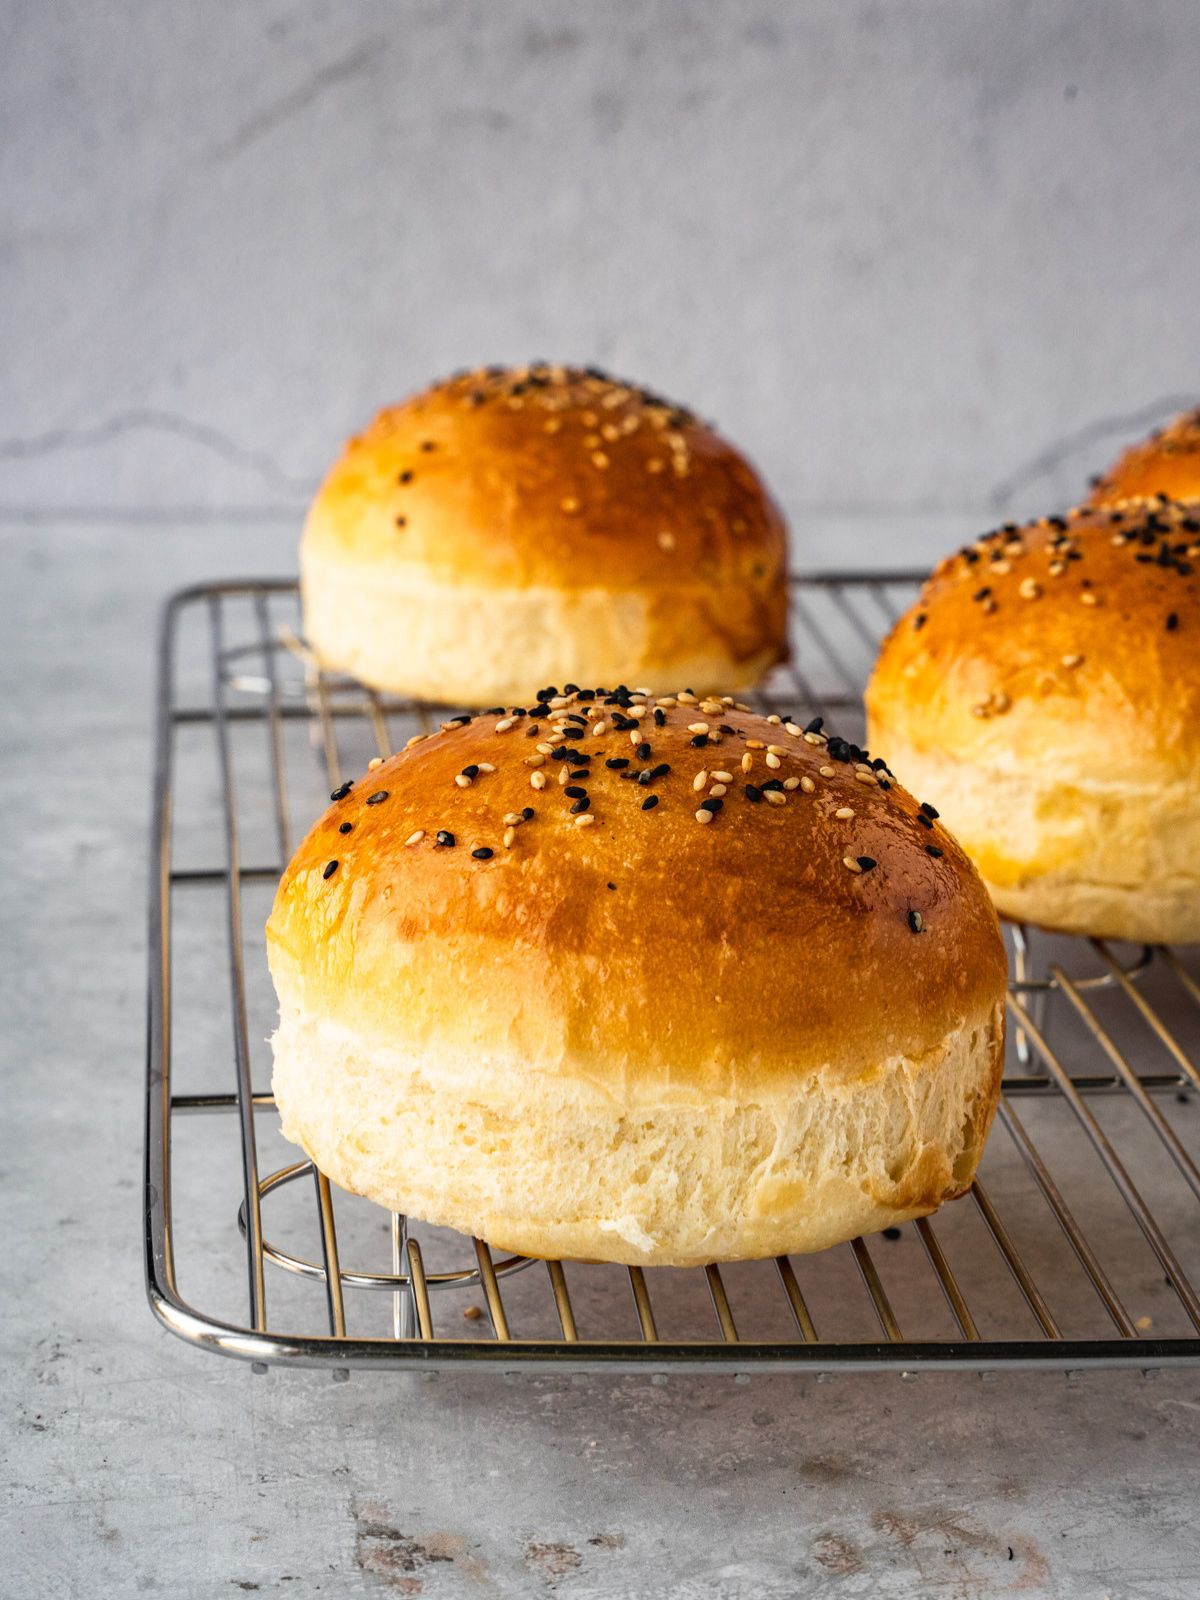
Table of Contents
Why This Recipe Works

- Easy to make. Uses basic pantry ingredients (flour, yeast, sugar, salt, milk, butter, egg) and simple equipment. Knead, rise, bake. Nothing overly complicated.
- Make them smaller. Looking to make slider buns instead, follow the recipe as written and just divide into 12 instead of 6.
Ingredients
You probably have all these ingredients in your pantry and fridge right now! Here’s what you will need to make these buns:
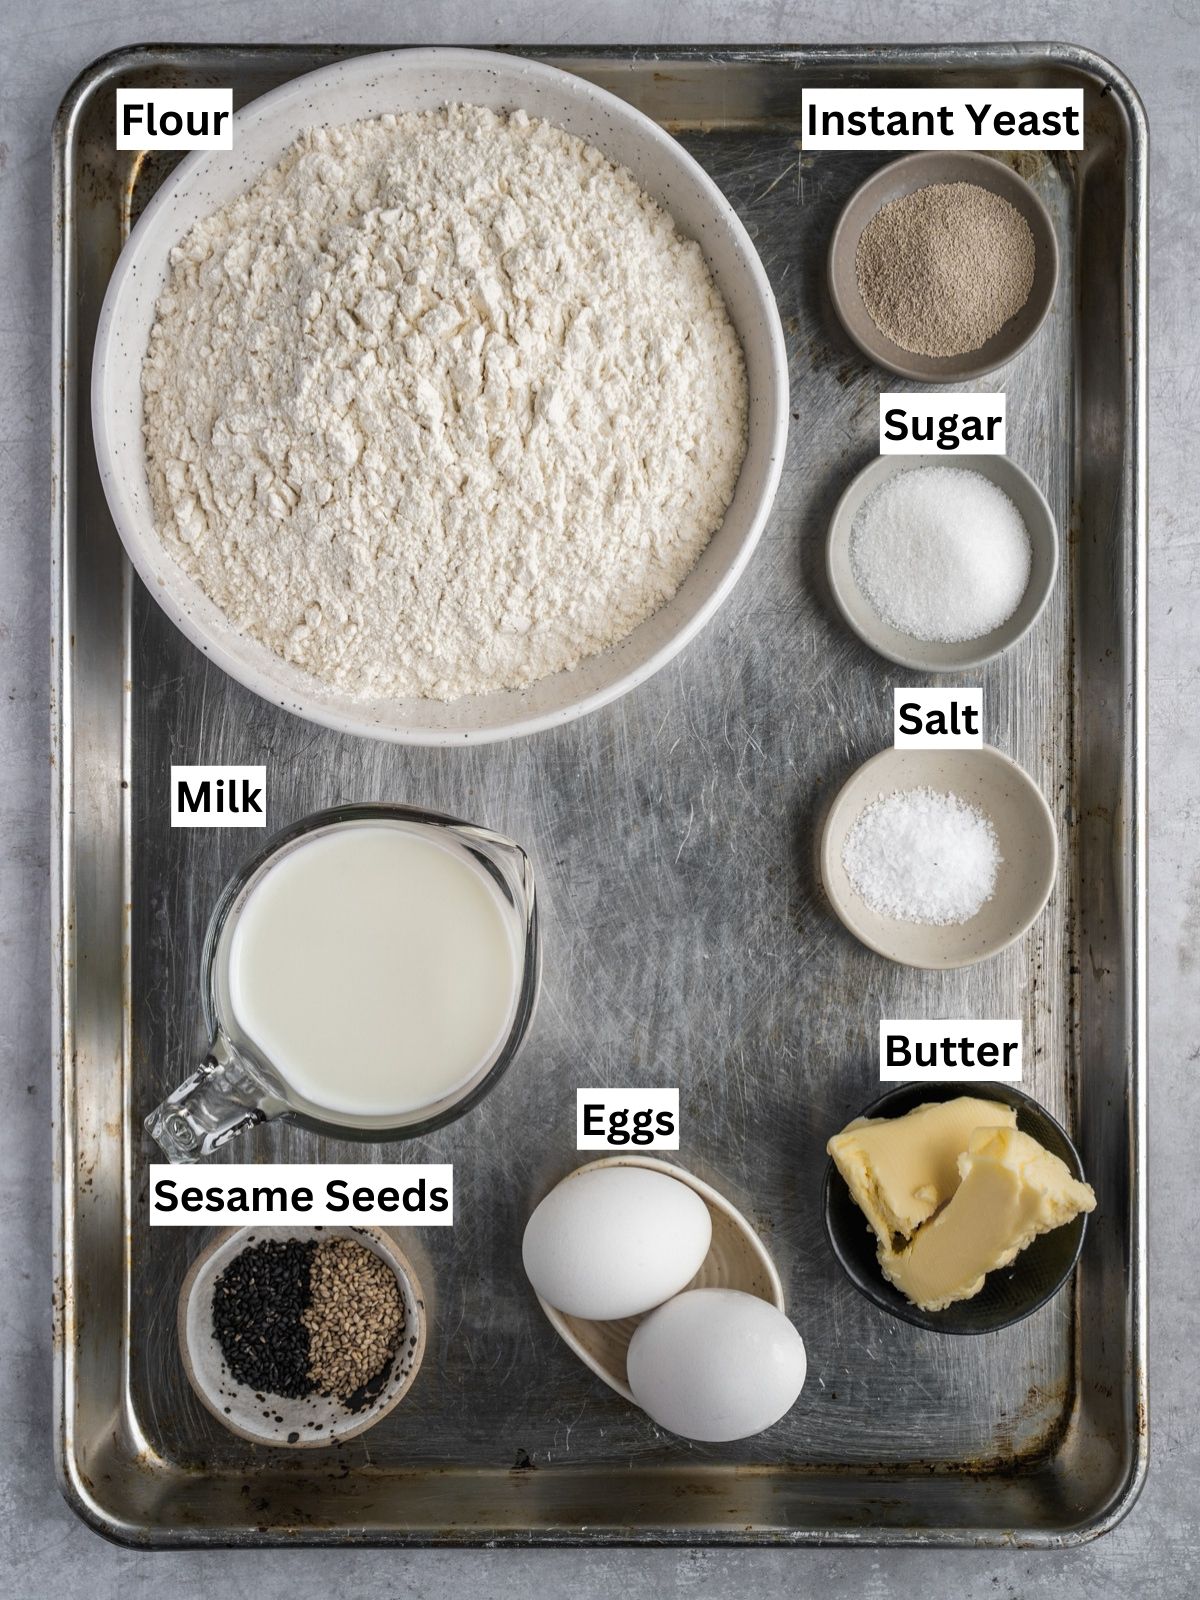
- Flour: I am using all-purpose flour here. Bread flour can also be used for a chewier texture. You can also substitute in some whole wheat flour if you prefer.
- Yeast: I recommend using instant yeast. It can be mixed into the dry ingredients without pre-blooming in liquid. It helps the dough rise quickly. It’s what I use in most of my baking recipes. Active dry yeast can be used, but you will have to bloom it in the milk. To do that, warm up the milk slightly, add the dry active yeast to it along with the sugar, stir to combine and set aside.
- Milk: Adds richness and tenderness. Use whole milk or 2%. If you are using instant yeast, you don’t need to use warm milk. You could use water instead of the milk, but the rolls won’t be as rich.
- Egg: This recipe calls for 1 whole egg (for the dough) and an egg yolk for the egg wash. I don’t recommend substituting the egg in the dough, but you can swap out the yolk for milk to glaze the buns.
- Toppings: Sesame seeds (both white and black) give these buns more flavor and they will look great too. You can also use poppy seeds.
Refer to the recipe card at the bottom of this post for a full list of ingredients and quantities.
How to Make this Homemade Hamburger Buns Recipe
Here’s my method for soft burger buns from scratch. This isn’t a difficult recipe, but I encourage you to look at all the steps and photos first to get familiar with the process.
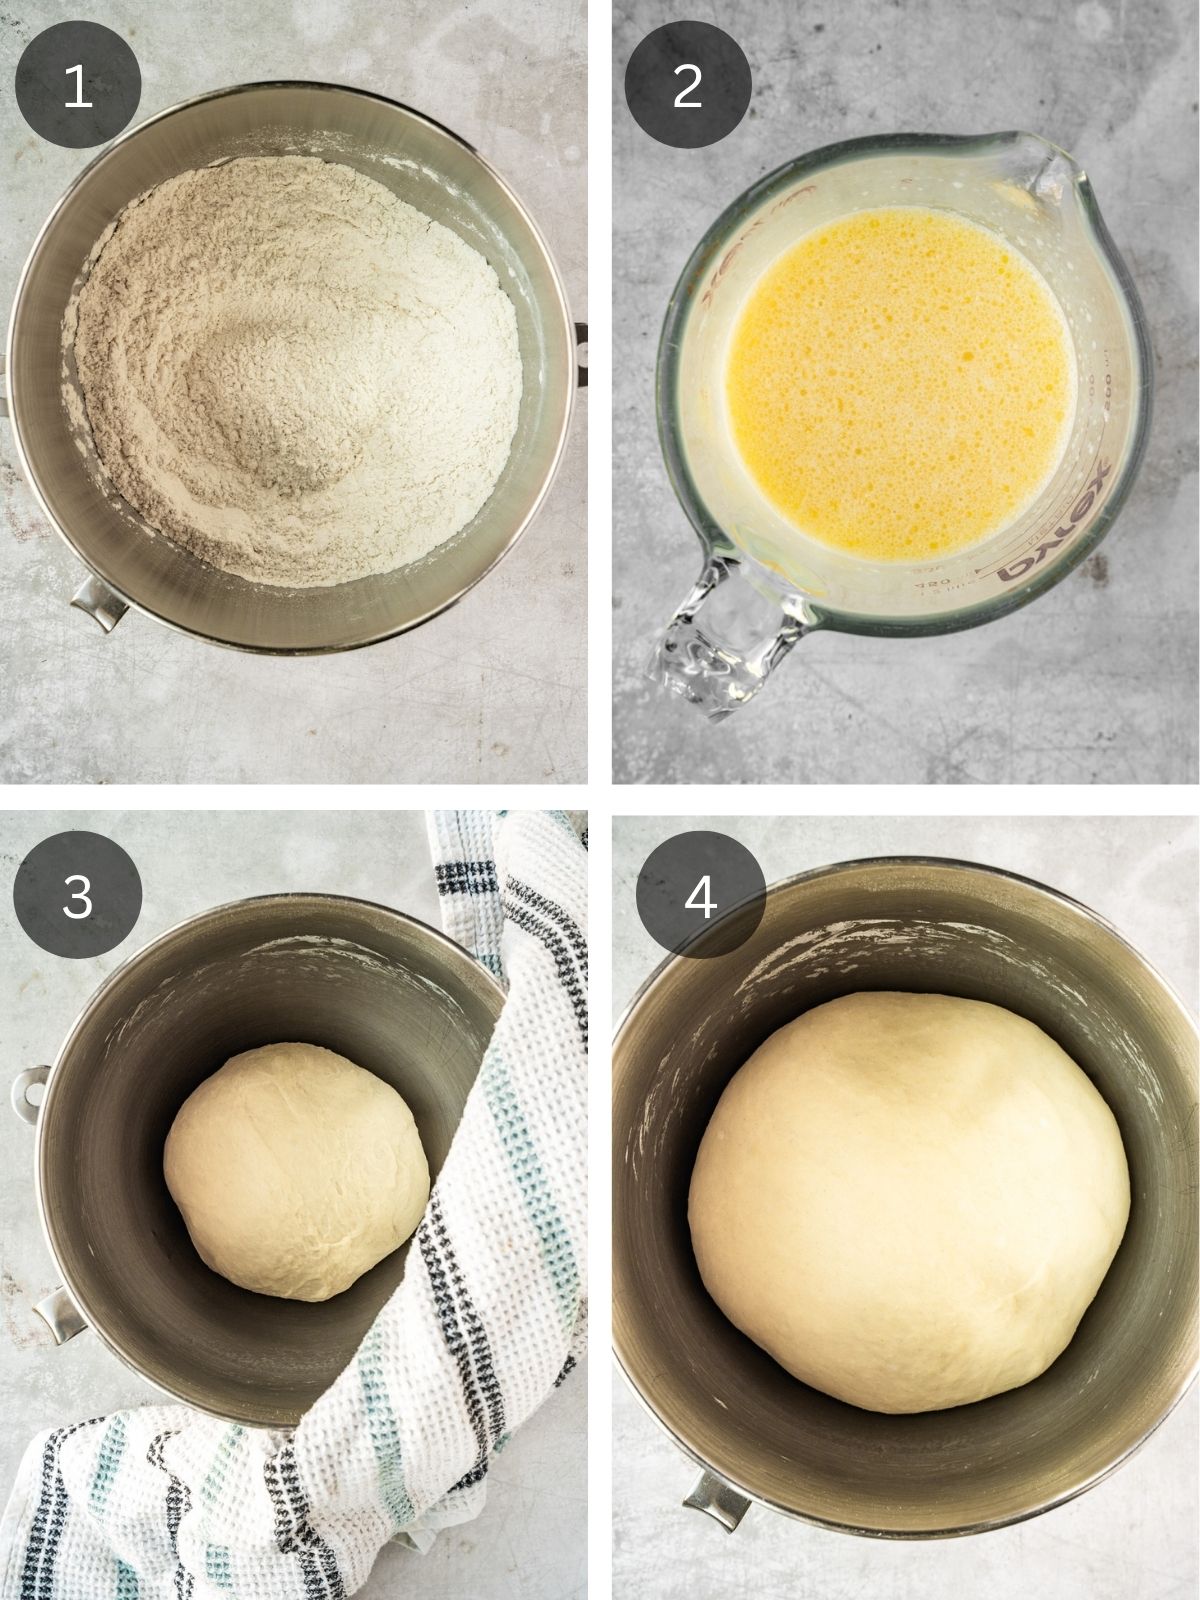
Step 1. Add Dry Ingredients. In the bowl of a stand mixer, combine the flour, yeast, sugar, and salt. Mix to combine (Image 1). You can also knead by hand using a large mixing bowl and wooden spoon.
Step 2. Mix Wet Ingredients. In a measuring cup, whisk together the milk, melted (and cooled) butter, and egg (Image 2).
Step 3. Knead. Pour the wet ingredients into the dry and knead using the dough hook attachment on medium‑low speed until a soft dough ball forms, about 7‑9 minutes. If the dough is sticking to the sides of the bowl, increase to medium speed. The dough should pull away into a loose ball (Image 3).
Step 4. First Rise. Using your hands, gently form a tight, smooth ball with the dough and drop it back into the mixer bowl. Cover the bowl with plastic wrap or a clean kitchen towel and let the dough rise in a warm place for 1 hour, or until doubled in size (Image 4).

Step 5. Divide. Punch down the dough and divide it into 6 equal pieces using a knife or bench scraper. Use a scale for precision; each piece should weigh about 135‑140 g (Image 5).
Step 6. Roll. Roll each piece into a tight ball by cupping your hand over the dough and moving it in a circular motion on the countertop. Only lightly flour the work surface if you need it.
Step 7. Arrange. Place the dough balls, seam side down, on a parchment-lined baking sheet. The dough balls shouldn’t be touching. Leave about 2‑3 inches of space between the buns. Optionally, use a ring mold around the dough balls (Image 6).
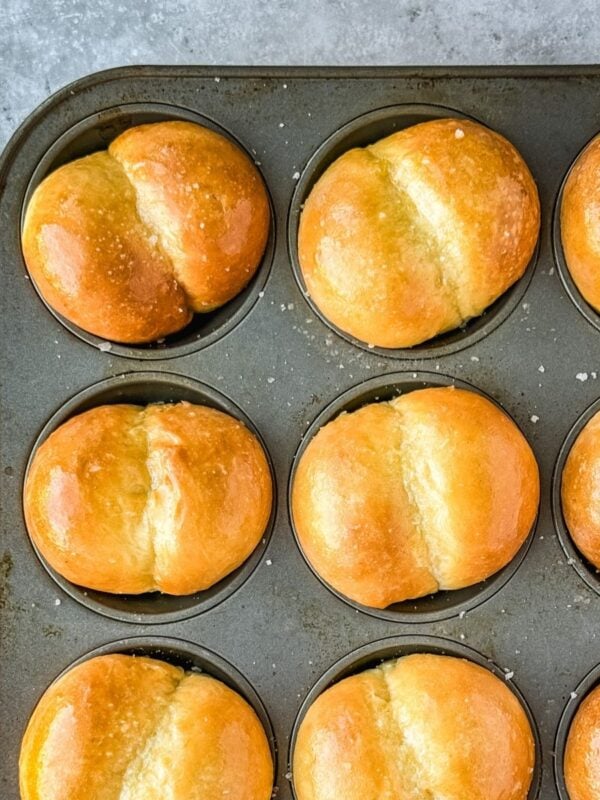
Step 8. Second Rise. Cover with a kitchen towel and let rise for another 1.5 hours, until puffy (Image 7).
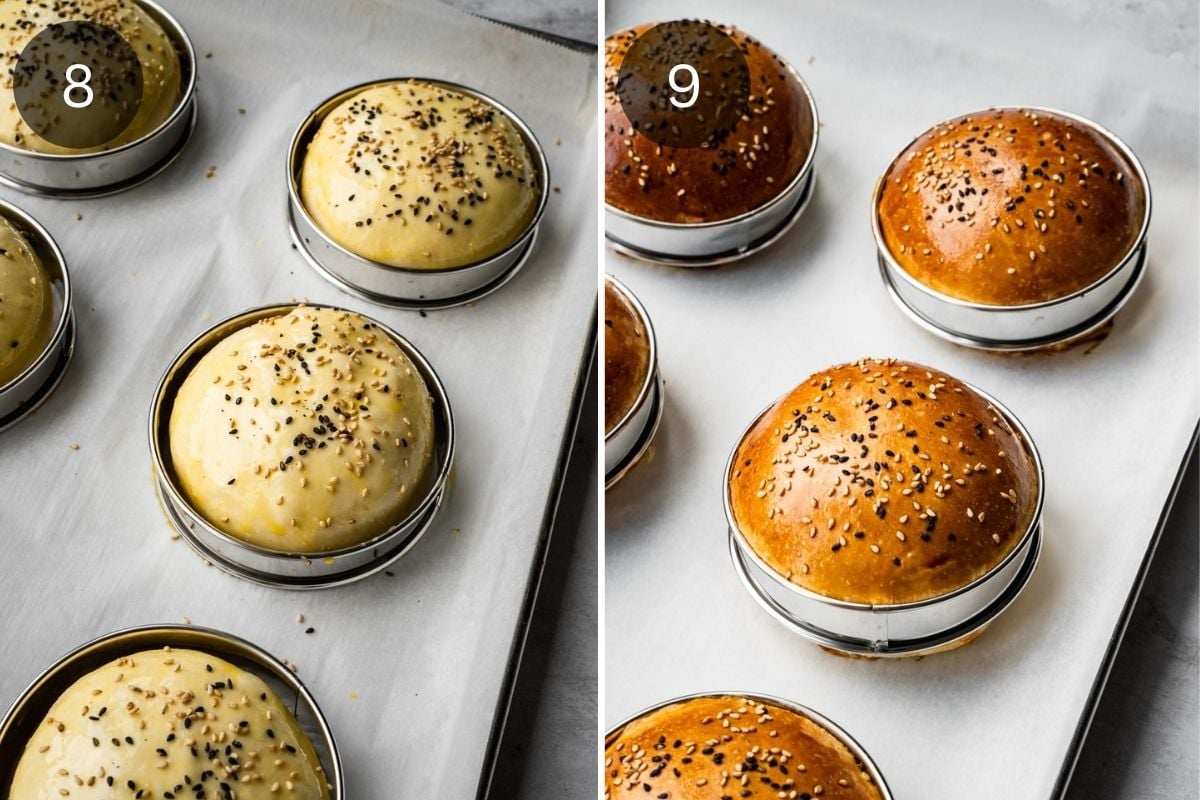
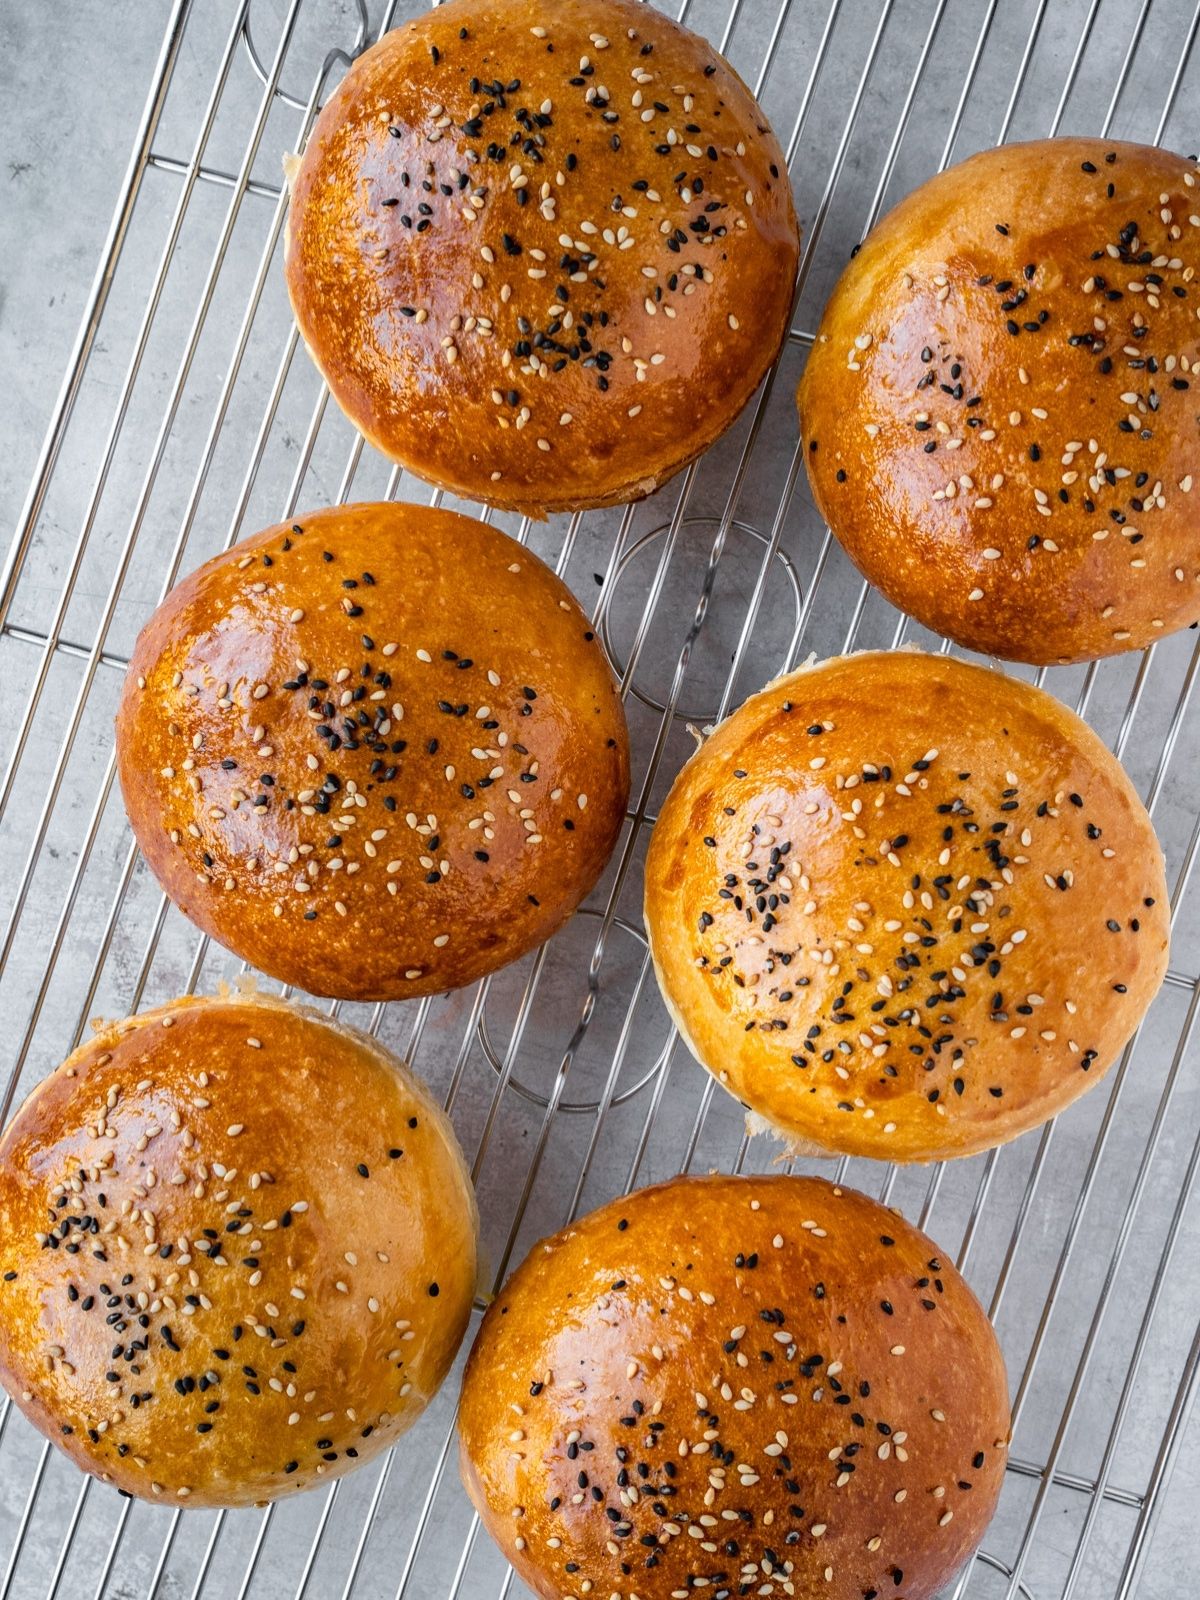
Step 9. Brush and Dress. Brush each bun with egg wash and sprinkle sesame seeds (Image 8). Preheat your oven to 350°F (175°C).
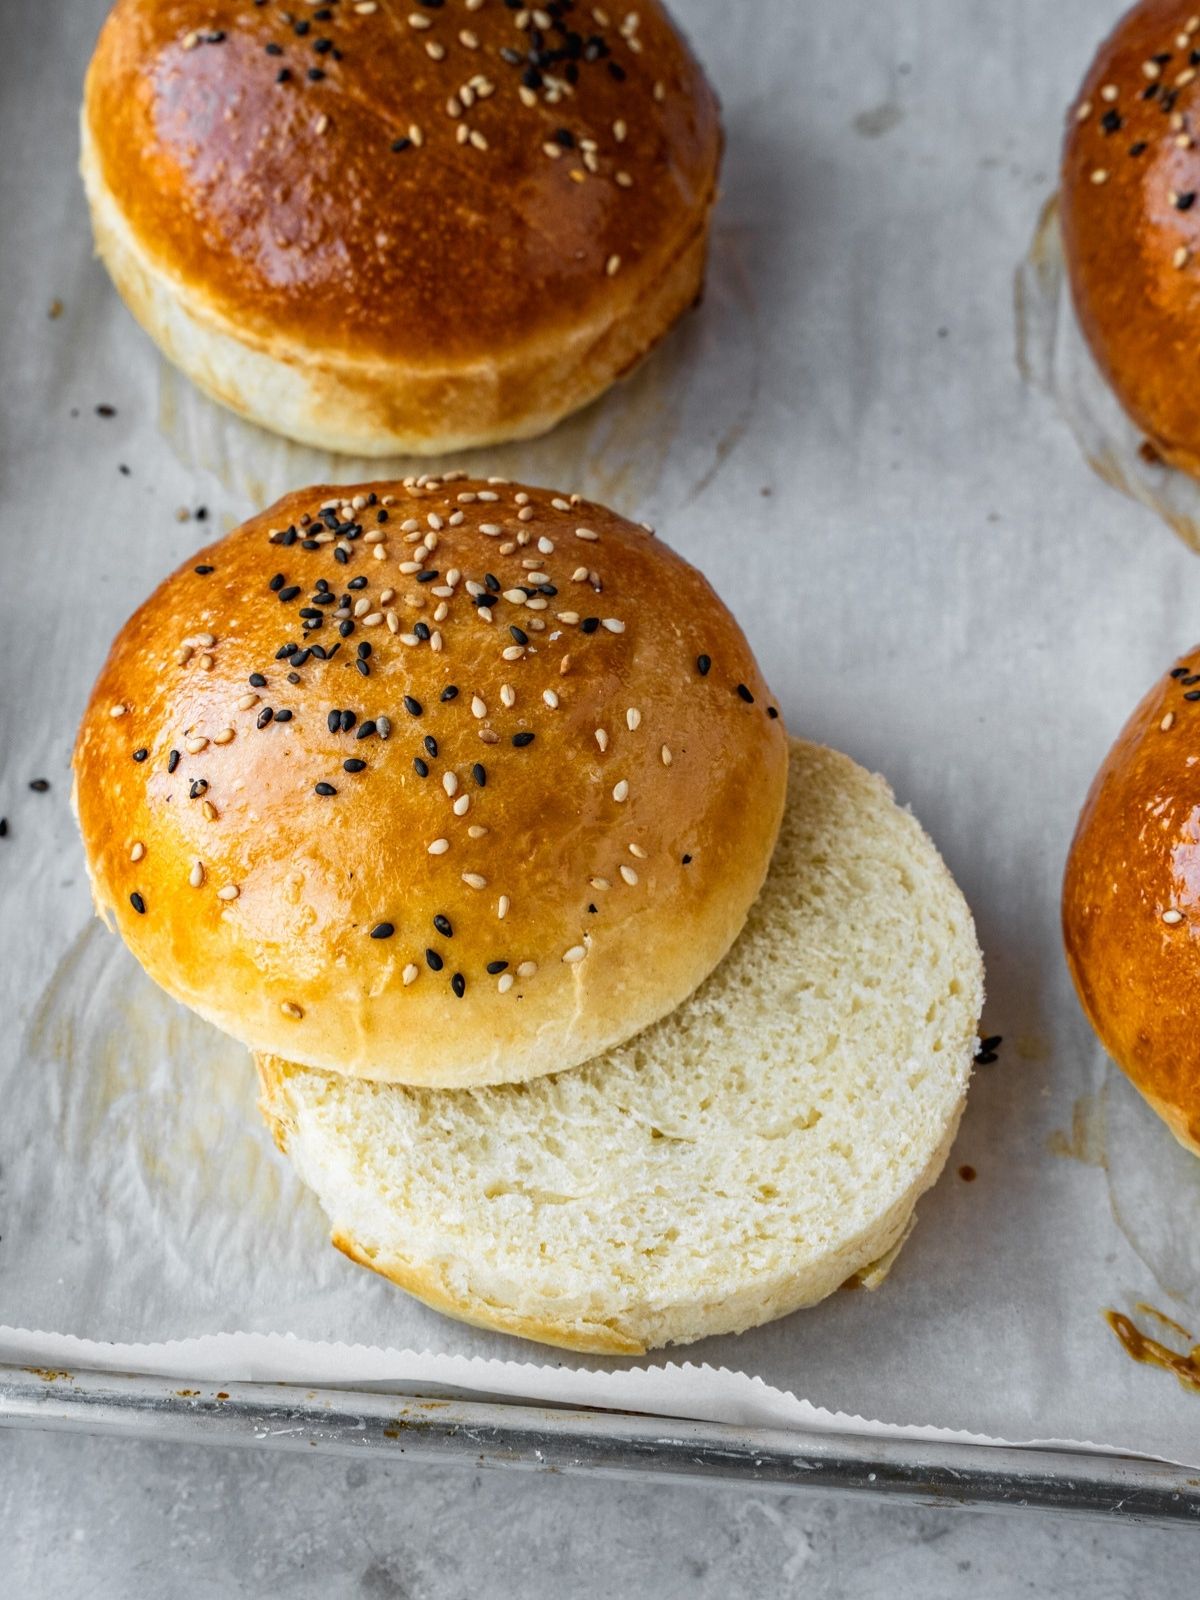
Step 10. Bake. Bake the buns for 22‑25 minutes, or until golden brown on top (Image 9).
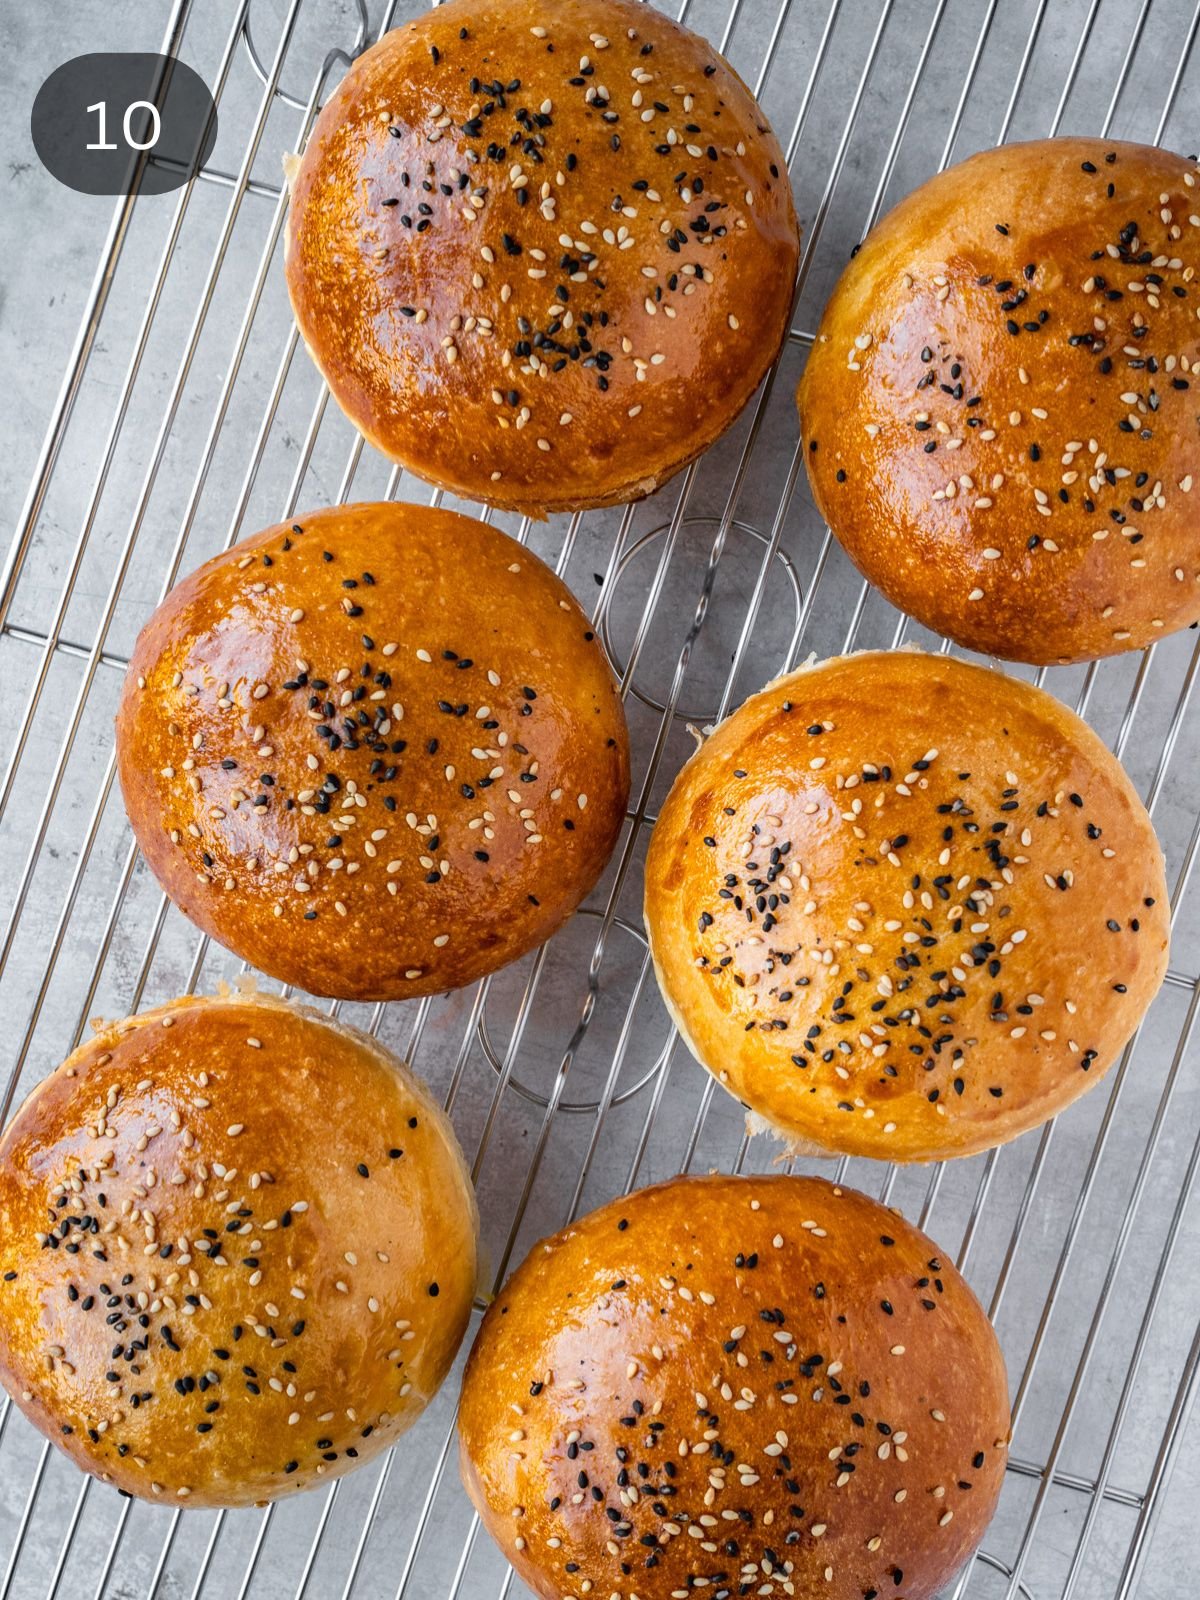
Step 11. Remove Molds. If you are using ring molds, remove them within 5 minutes after baking. Leave the buns to fully cool on a rack (Image 10).
Pros & Cons of Using a Ring Mold
If you’re wondering whether to use a ring for your burger buns, here are some of the advantages and trade‑offs based on my experience making this recipe a half dozen times.
| Pros | Cons |
| Uniform size and shape: rings help the buns all bake to the same diameter, with clean edges. Great if you want “pretty buns” for burgers, matching buns and patties. | Extra work/tools needed: have to get molds and prep them (grease). |
| Helps control spread during proof and bake: if the dough is soft and might flatten too much, the ring keeps its shape and height. | Possible impact on crust/browning/texture: edges of the ring mold might shade or insulate sides of bun, changing how crust forms; the sides in contact with the ring may bake differently. |
| Ease of splitting/slicing: a ring can give you a nice, straight side which makes slicing in half easier and more consistent. | Sticky molds: Even with greasing, removing the mold right away after baking might be tricky (hot, sticking). |
If you try this recipe with a ring mold, I recommend using rings that are about the same diameter as your desired finished bun (4 inches is perfect for a standard bun), lightly greasing them, and positioning the dough ball in them right after forming.
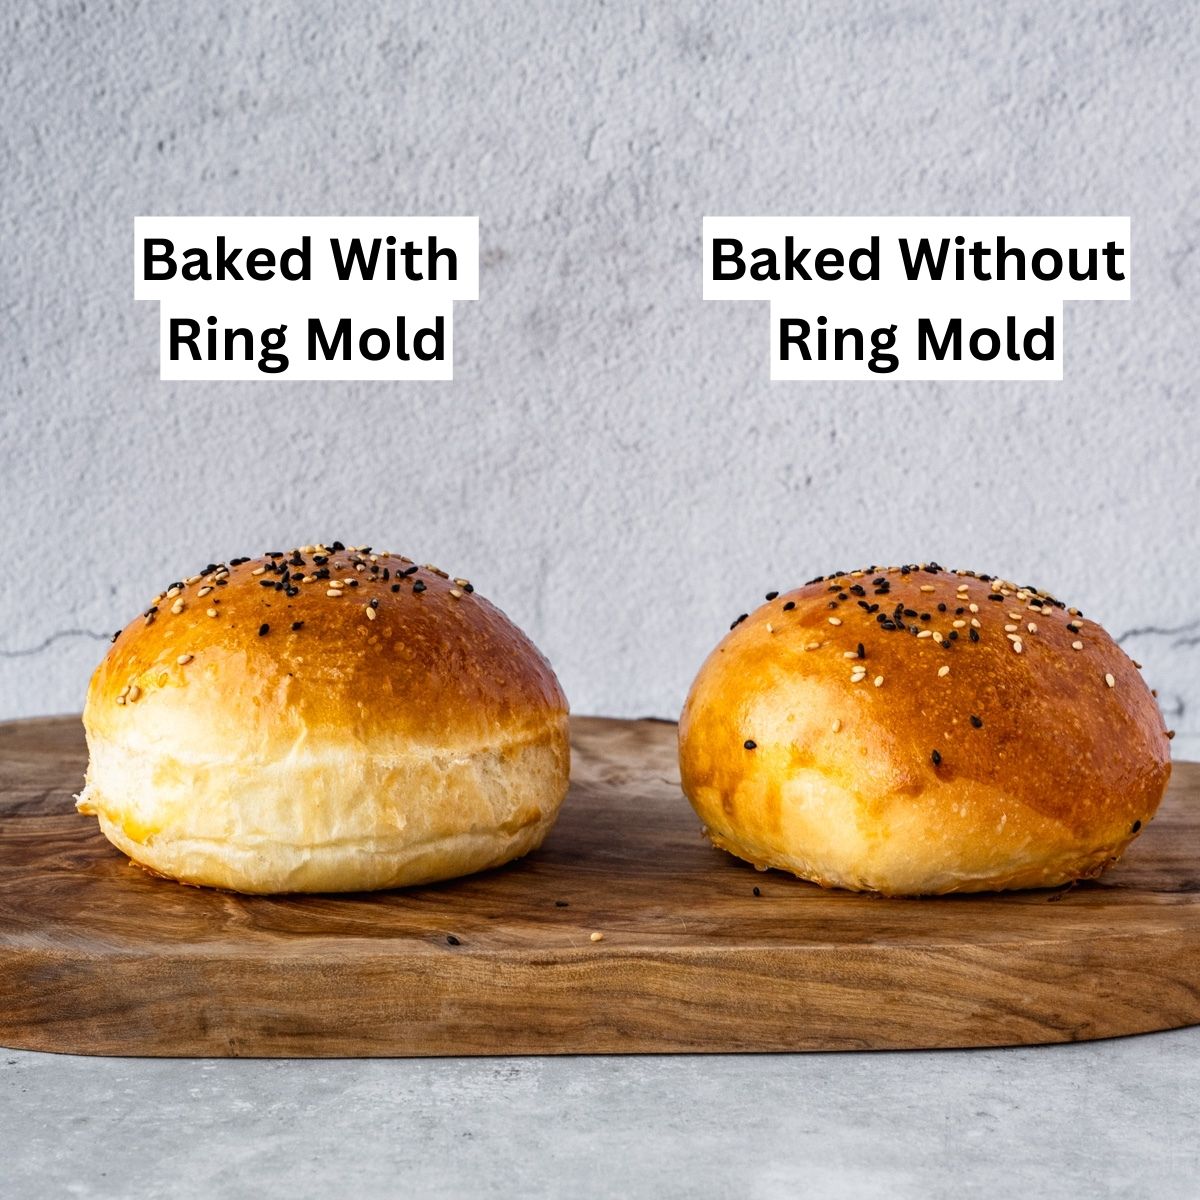
Remove the rings shortly after baking if possible (once buns hold their shape) so they don’t cause soggy/steamed sides. Even if you grease the molds, they may stick to the bun. Gently coax the buns out of the molds and you’ll be left with a perfectly shaped, tall hamburger bun.
Expert Tips
- Weigh Everything. Using a kitchen scale ensures consistency in ingredient amounts and perfectly uniform dough balls. I do my best to include both metric and US customary measurements in my baking recipes. But I always highly recommend you weigh out the ingredients, especially the flour and liquid.
- Use unsalted butter. If you only have salted butter, you can use it in the dough, but you will need to reduce the amount of salt from 1.5 teaspoon to 1 teaspoon in the dry ingredients.
- If the dough feels very sticky after kneading, resist the urge to dump in a lot more flour. A soft dough will yield a softer bun.
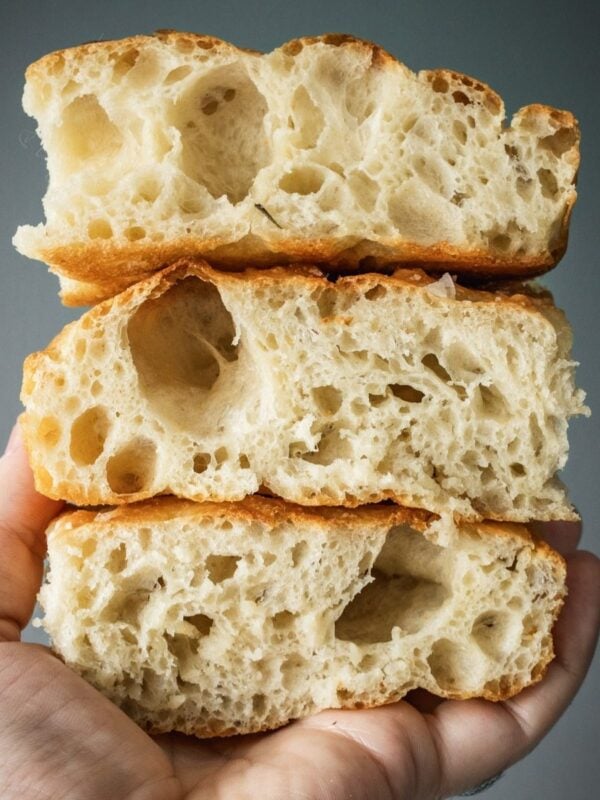
- Let buns cool completely on a wire rack before slicing, so the crumb sets and they don’t get gummy inside.
- If using ring molds, make sure to lightly butter, oil or spray them.
Recipe FAQs
Yes. After kneading, you can refrigerate the dough (covered) for a few hours or overnight. Before proceeding, bring it back to room temp, let it rise, then divide, rest, second rise, etc.
Once baked and cooled, store buns in a bread box, plastic bag or sealed airtight container at room temperature. They’ll stay fresh for 2 days.
After baking and cooling, wrap buns tightly in plastic wrap (or in freezer bags). Freeze for up to 2‑3 months. To use, thaw at room temp, then warm in the oven (about 300°F/150°C) for 5‑10 minutes to refresh the crust. You can also pre-cut the buns before freezing, which makes defrosting and toasting them a breeze when you’re ready to use them.
More Baking Recipes
Baking
Dessert
Baking
Ideas and Roundups
If you make this Homemade Hamburger Buns recipe or any other baking recipe on Urban Farm and Kitchen, please take a moment to rate the recipe ⭐⭐⭐⭐⭐ and leave a comment below. It’s such a help to others who want to try the recipe.
For more Urban Farm and Kitchen, follow along on Instagram, Facebook, and Pinterest, visit the Urban Farm Shop, or subscribe for new posts via email.
Homemade Hamburger Buns Recipe
Equipment
- 4 Inch Ring Molds – Optional (Affiliate Link)
Ingredients
Base Dough
- 3 cup All purpose flour – 450 grams
- 2¼ teaspoon Instant yeast – 7 grams or 1 packet
- 1 tablespoon Sugar – 12 grams
- 1½ teaspoon Kosher salt – 8 grams
- 1 cup Lukewarm whole milk – 240 ml
- 4 tablespoon Melted unsalted butter – 56 grams
- 1 Large egg
- 1 teaspoon Butter – For greasing the ring molds
Topping
- 1 Egg yolk
- 1 tablespoon Water
- White and black sesame seeds
Instructions
- Add Dry Ingredients. In the bowl of a stand mixer, combine 3 cup All purpose flour, 2¼ teaspoon Instant yeast, 1 tablespoon Sugar, and 1½ teaspoon Kosher salt. Mix to combine. You can also knead by hand using a large mixing bowl and a wooden spoon.
- Mix Wet Ingredients. In a measuring cup, whisk together 1 cup Lukewarm whole milk, 4 tablespoon Melted unsalted butter, and 1 Large egg.
- Knead. Pour the wet ingredients into the dry and knead using the dough hook on medium-low speed until a soft dough ball forms, about 7-9 minutes. If the dough is sticking to the sides of the bowl, increase to medium speed. The dough should pull away from a loose ball. Try not to add more flour unless you must.
- First Rise. Using your hands, gently form a tight smooth ball with the dough and drop it back into the mixer bowl. Cover the bowl with plastic wrap or clean kitchen towel and let the dough rise in a warm place for 1 hour, or until doubled in size.
- Divide. Punch down the dough and divide it into 6 equal pieces using a knife or bench scraper. Use a scale for precision; each piece should weigh about 135-140g. Note: for sliders, divide the dough into 12 pieces.
- Roll. Roll each piece into a tight ball by cupping your hand over the dough and moving it in a circular motion on the countertop. Only lightly flour the work surface if you need it.
- Arrange. Place the dough balls, seam side down, on a parchment-lined baking sheet. The dough balls shouldn’t be touching. Leave about 2‑3 inches of space between the buns. Optionally, use a ring mold around the dough balls. Grease the ring molds well with 1 teaspoon Butter.
- Second Rise. Cover with a kitchen towel and let rise for another 1.5 hours, until puffy.
- Brush and Dress. Brush each bun with egg wash (1 Egg yolk mixed with 1 tablespoon Water) and sprinkle White and black sesame seeds. Preheat your oven to 350°F (175°C).
- Bake. Bake the buns for 22‑25 minutes, or until golden brown on top.
- Remove Molds. If you are using ring molds, remove them within 5 minutes after baking. Leave the buns to fully cool on a rack.
Notes
- Flour: I use all purpose flour most of the time. Bread flour can also be used for a chewier texture. You can also substitute in some whole wheat flour if you prefer.
- Yeast: I recommend using instant yeast. It can be mixed into the dry ingredients without pre-blooming in liquid. It helps the dough rise quickly and efficiently. Active dry yeast can be used of course, but you will have to bloom it the milk. To do that, warm up the milk slightly, add the dry active yeast to it along with the sugar, stir to combine and set aside.
- Milk: Adds richness and tenderness. Use whole milk or 2%. If you are using instant yeast, you don’t need to use warm milk. You could use water instead of the milk, but the rolls won’t be as rich.
- Egg: This recipe calls for 1 whole egg (for the dough) and an egg yolk for the egg wash. I don’t recommend substituting the egg in the dough, but you can swap out the yolk for milk to glaze the buns.
- Toppings: Sesame seeds (both white and black) give these buns more flavor and they will look great too. You can also use poppy seeds.
- Weigh Everything. Using a kitchen scale ensures consistency in ingredient amounts and perfectly uniform dough balls.
- Don’t skip the second rise. It’s key to a fluffy bun. Dough should be puffy and marshmallow-like when ready.
- If you try this recipe with a ring mold, I recommend using rings that are about the same diameter as your desired finished bun (4 inches is perfect for a standard bun), lightly greasing them, and positioning the dough in them right after you have formed the right balls.
- Remove the rings shortly after baking if possible (once buns hold their shape) so they don’t cause soggy/steamed sides. Even if you grease the molds, they may stick to the bun. Gently coax the buns out of the molds and you’ll be left with a perfectly shaped, tall hamburger bun.
Nutrition
Nutrition information is automatically calculated, so should only be used as an approximation.
 Like this recipe? Rate & comment below!