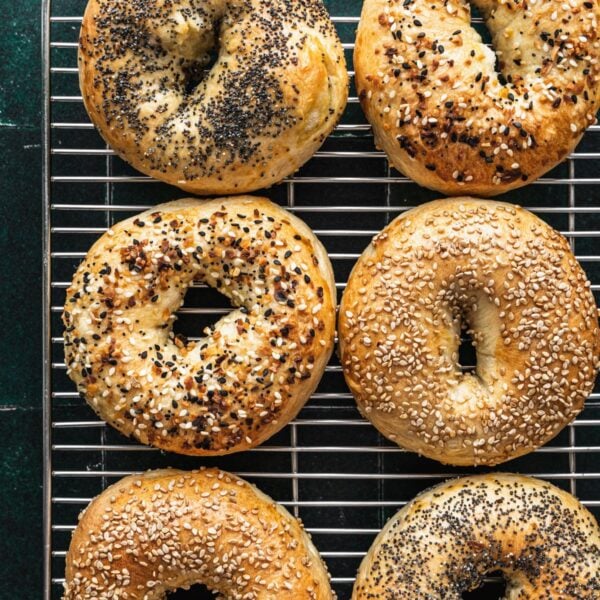
My New York Style Bagel Recipe is straightforward, delicious and so very rewarding. The crisp, golden crust gives way to a perfectly chewy interior. I have spent countless weekends perfecting this recipe. I can confidently say that making them at home is worth every moment of effort.
Go traditional and slather on some cream cheese and layer on smoked salmon. Or change it up and enjoy them with homemade labneh or labneh balls.

Table of Contents
What are New York Bagels?
New York bagels are emblematic of New York City. These dense, chewy rings of dough undergo a boiling process prior to baking, resulting in their unique texture and sheen.
Their origins can be traced to the late 19th and early 20th centuries when Eastern European Jewish immigrants introduced their bagel-making traditions to the city.
Over time, the New York bagel became a cultural staple across the USA and beyond, often enjoyed with cream cheese, lox, capers, or a variety of spreads.

New York Bagels Vs Montreal Bagels
The rivalry between New York and Montreal bagels is a heated one. While New York bagels are plump and chewy, Montreal bagels are smaller, denser, and sweeter, often boiled in honey-sweetened water and baked in wood-fired ovens.
As an ex-Montrealer myself, it’s Montreal Bagels all the way for me! But they can be a little challenging to make for the home baker. New York Style bagels are much easier to make especially for beginners.
I would encourage you to also try my Jerusalem Bagel recipe (also known as Ka’ak al Quds) and Simit (Turkish sesame bread). Also, try my Homemade Soft Pretzel recipe.
Ingredients
This recipe doesn’t have any complicated or hard to find ingredients. Traditionally this recipe uses barley malt syrup, but I suggest that you substitute or omit it because it’s not an easy ingredient to find.

- Bread flour: High-protein flour is essential for that chewy texture. You can substitute with all-purpose flour, but the results may be softer.
- Instant yeast: Helps the dough rise efficiently. Active dry yeast can also be used but requires blooming in water first. You’ll find that most of my baking recipes use instant yeast. It’s just easier to work with and why not make our lives a little easier?
- Sugar: Adds a touch of sweetness and feeds the yeast. Substitute with honey or brown sugar if you like.
- Barley malt syrup (optional, use only if you have it): Used in the boiling water to give the bagels their signature golden sheen and subtle malty flavor. But honestly don’t stress here. Don’t go out of your way to find this ingredient. Substitute with molasses or honey, or add nothing to the boiling water.
- Toppings: Sesame seeds, poppy seeds, everything seasoning, or plain salt. The choice is yours. You can use them all which is what I usually do because I like the variety.
- Egg wash: Helps the toppings stick and gives the bagels a shiny crust.
Refer to the recipe card at the bottom of this post for the full list of ingredients and quantities.
How to Make New York-Style bagels
You can do this! This might seem like a complicated recipe, but it’s actually very straightforward. Read through all the steps to get your bearings.

Step 1. Make the bagel dough. To a bowl of a stand mixer, add the water, yeast and sugar. Stir to combine (Image 1). Add the flour and salt. Run the mixer with the dough hook attachment on medium-low speed until the dough comes together. Knead for 8-10 minutes (Image 2). Alternatively, you can use a large bowl to mix the ingredients and knead the dough on a clean work surface like your countertop until it’s supple.

Step 2. Rise. Once the dough is ready, shape it into a dough ball and place it in a large lightly oiled bowl (or use the bowl of the stand mixer). Cover it with a damp towel and let it rise in a warm place for about 1 to 1.5 hours, or until it has doubled in size (Images 3-4). This step allows the yeast to work its magic, creating a dough that’s light yet sturdy.

Step 3. Divide. After the dough has risen, punch it down to release any trapped air. Divide it into 6 equal pieces of dough (for large bagels) or 9 pieces (for smaller bagels) and roll each piece into a ball (Image 5). Rest for 10 minutes (Image 6).

Step 4. Shape. To shape the bagels, poke a hole in the center of each dough ball using your index finger. Then gently stretch the dough ball using your index fingers to form a ring. Aim for uniform shaped bagels to ensure even baking (Images 7-8).

Step 5. Boil. Preheat your oven to 425°F (220°C) and line a baking sheet with parchment paper and sprinkle on some of the topping (this will form the bottom crust of your bagels). Bring a large pot of water to a boil and add optional barley malt syrup, honey, or brown sugar. Boil the bagels in batches for 1-2 minutes per side. This step is what gives bagels their distinctive crust and chewy interior (Image 9). Use a slotted spoon to remove the boiled bagels and place them on the prepared baking sheet on top of the desired topping (Image 10).

Step 6. Brush and dress. While the bagels are still wet and tacky from boiling, brush them with egg wash and sprinkle your chosen toppings (Images 11-12).

Step 7. Bake. Bake the bagels in the preheated oven for 20-25 minutes, or until they turn golden brown and crisp. Let them cool slightly before enjoying (Image 13).
New York Bagels Video Tutorial
Expert Tips
- Kneading. Proper kneading is key to achieving the ideal chewiness. If the bagel dough feels too sticky, add flour a tablespoon at a time until manageable. I like my bagel dough to be supple, but not sticky.
- Proofing. Don’t rush the rise. A well-proofed dough makes a big difference in texture. But do keep in mind that the dough will rise faster in a warm kitchen. So if you’re making this recipe in the summer, the dough might be ready sooner than you think, so keep an eye on it.
- Overnight cold proof. This is optional, but you can let your kneaded dough rise overnight in the fridge. This slow rise improves flavor.
- Shaping. Consistency is key. I like to use a kitchen scale to ensure uniform bagel sizes, which helps them bake evenly. It also looks more professional.
- Make it vegan. Skip the egg wash to keep this recipe vegan.

Recipe FAQs
Yes! After shaping the bagels, place them on a baking sheet, cover tightly with plastic wrap, and refrigerate overnight. Boil and bake them the next day for freshly baked homemade bagels.
Store at room temperature in a paper bag for up to 2 days. For longer storage, freeze them. I like to slice the bagels before freezing them for easy toasting later. Just take them out of the freezer, use a butter knife to crack them open and toast.
No, boiling is essential for the authentic chewy texture and shiny crust that defines a New York bagel.
Other Baking Recipes
If you make this New York Bagel Recipe or any other Baking recipes on Urban Farm and Kitchen, please take a moment to rate the recipe ⭐⭐⭐⭐⭐ and leave a comment below. It’s such a help to others who want to try the recipe.
For more Urban Farm and Kitchen, follow along on Instagram, Facebook, and Pinterest, visit the Urban Farm Shop, or subscribe for new posts via email.
New York Style Bagel Recipe
Equipment
- Stand Mixer – Optional
Ingredients
- 1⅓ cups Room temperature water (320 grams)
- 2¼ teaspoon Instant yeast (7 grams or 1 packet)
- 1 tablespoon Sugar (12 grams)
- 3½ cups Bread flour (520 grams)
- 2 teaspoon Kosher salt (10 grams)
Boiling Water Bath
- 4-6 cups Water – Enough to fill a wide pan about halfway through
- 2 tablespoon Barley malt syrup, honey or brown sugar – Optional
Toppings
- 1 Egg – Beaten
- 3 tablespoon Sesame seeds
- 3 tablespoon Everything Bagel seasoning
- 3 tablespoon Poppy seeds
Instructions
- Make the bagel dough. To a bowl of a stand mixer, add the 1⅓ cups Room temperature water , 2¼ teaspoon Instant yeast and 1 tablespoon Sugar. Stir to combine. Add 3½ cups Bread flour and 2 teaspoon Kosher salt. Run the mixer with the dough hook attachment on medium-low speed until the dough comes together. Knead for 8-10 minutes. Alternatively, you can use a large bowl to mix the ingredients and knead the dough on a clean work surface like your countertop until it’s supple. Note: Proper kneading is crucial for developing the gluten that gives chewy bagels their signature texture.
- Rise. Once the dough is ready, shape it into a dough ball and place it in a large lightly oiled bowl (or use the bowl of the stand mixer). Cover it with a damp towel and let it rise in a warm place for about 1 to 1.5 hours, or until it has doubled in size.
- Divide. After the dough has risen, punch it down to release any trapped air. Divide it into 6 equal pieces of dough (for large bagels) or 9 pieces (for smaller bagels) and roll each piece into a ball. Rest on the counter for 10 minutes.
- Shape. To shape the bagels, poke a hole in the center of each dough ball using your index finger. Then gently stretch the dough ball using your index fingers to form a ring. Aim for uniform shaped bagels to ensure even baking.
- Boil. Preheat your oven to 425°F (220°C) and line a baking sheet with parchment paper and sprinkle on some of the topping (this will form the bottom crust of your bagels). Bring a large pot of water to a boil and add the optional 2 tablespoon Barley malt syrup, honey or brown sugar. Boil the bagels in batches for 1-2 minutes per side. This step is what gives bagels their distinctive crust and chewy interior. Use a slotted spoon to remove the boiled bagels and place them on the prepared baking sheet on top of the desired topping.
- Brush and dress. While the bagels are still wet and tacky from boiling, brush them with egg wash and sprinkle your chosen toppings.
- Bake. Bake the bagels in the preheated oven for 20-25 minutes, or until they turn golden brown and crisp. Let them cool slightly before enjoying.
Video
Notes
- Bread flour: High-protein flour is essential for that chewy texture. You can substitute with all-purpose flour, but the results may be softer (but it’ll still work).
- Instant yeast: Active dry yeast can also be used but requires blooming in water first.
- Barley malt syrup (optional, use only if you have it): Used in the boiling water to give the bagels their signature golden sheen and subtle malty flavor. But honestly don’t stress here. Don’t go out of your way to find this ingredient. Substitute with molasses or honey, or add nothing to the boiling water.
- Toppings: Sesame seeds, poppy seeds, everything seasoning, or plain salt. The choice is yours. You can use them all which is what I usually do because I like the variety.
- Don’t skip the boiling step! This is what gives the bagels their chewy, tight-crumb texture.
- Don’t rush the process. Proper kneading helps develop the gluten, a long enough rest period helps the dough rise and become workable, and resting the dough balls once shaped makes it easier to stretch them out into bagels.
- Every kitchen is different. Humidity levels and temperature can vary from kitchen to kitchen, and from season to season. When making the dough, trust your instincts. If your kitchen is warm, the dough may rise faster than expected.
- Overnight proof. You can refrigerate your dough overnight once kneaded. This improves flavor and can make the dough easier to portion and shape the next day.
Nutrition
Nutrition information is automatically calculated, so should only be used as an approximation.
 Like this recipe? Rate & comment below!


They are amazing…one thing I would do though is cut the salt to 1 tsp.
I made these today and they are fantastic. My entire family enjoyed them. I will never buy bagels again.
Great step by step recipe and instructions. I’m in Texas and it’s impossible to find good authentic NY style bagels. This is so easy and the flavor and texture was perfection!
I made these bagels according to directions and they were amazing! Easy and delicious! I may never buy bagels again!