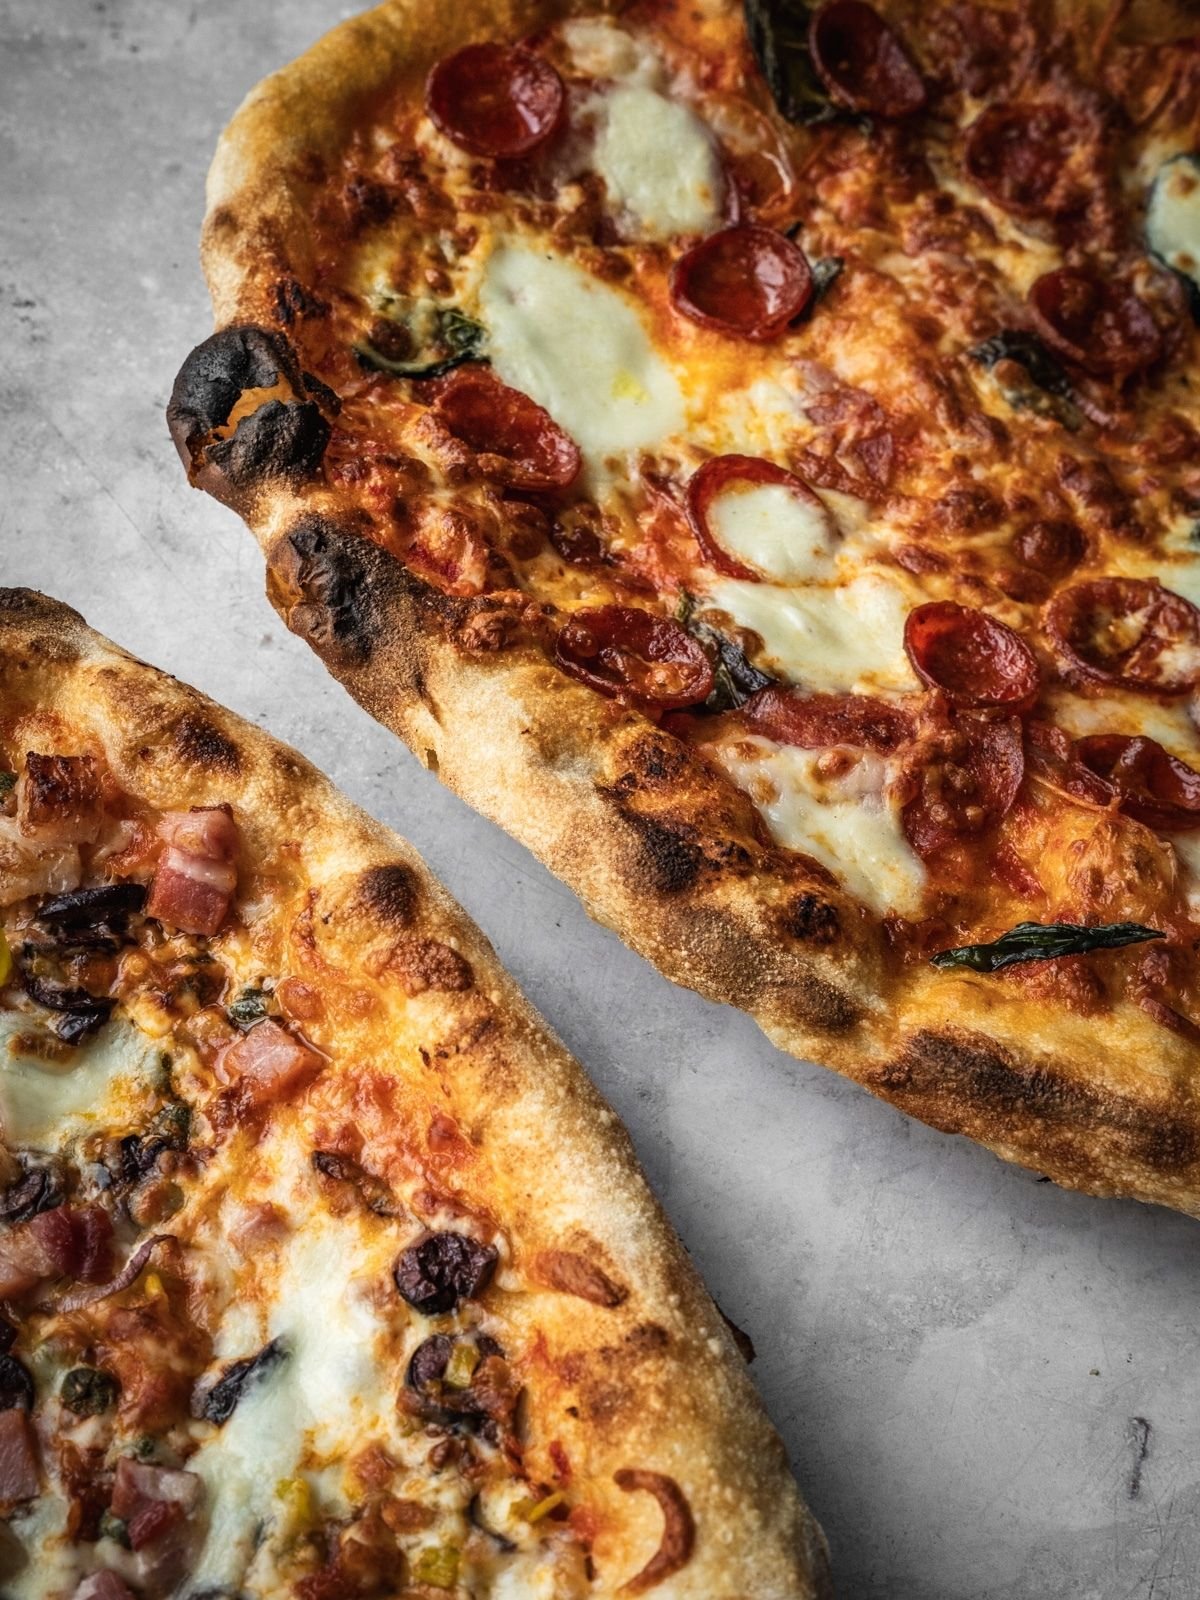
If you’re looking to level up from good pizza to great pizza, this Overnight Biga Neapolitan Pizza Dough recipe is the move. It’s got that classic tender chew, charred leopard spots, and a depth of flavor you just can’t get from a same-day homemade pizza dough.
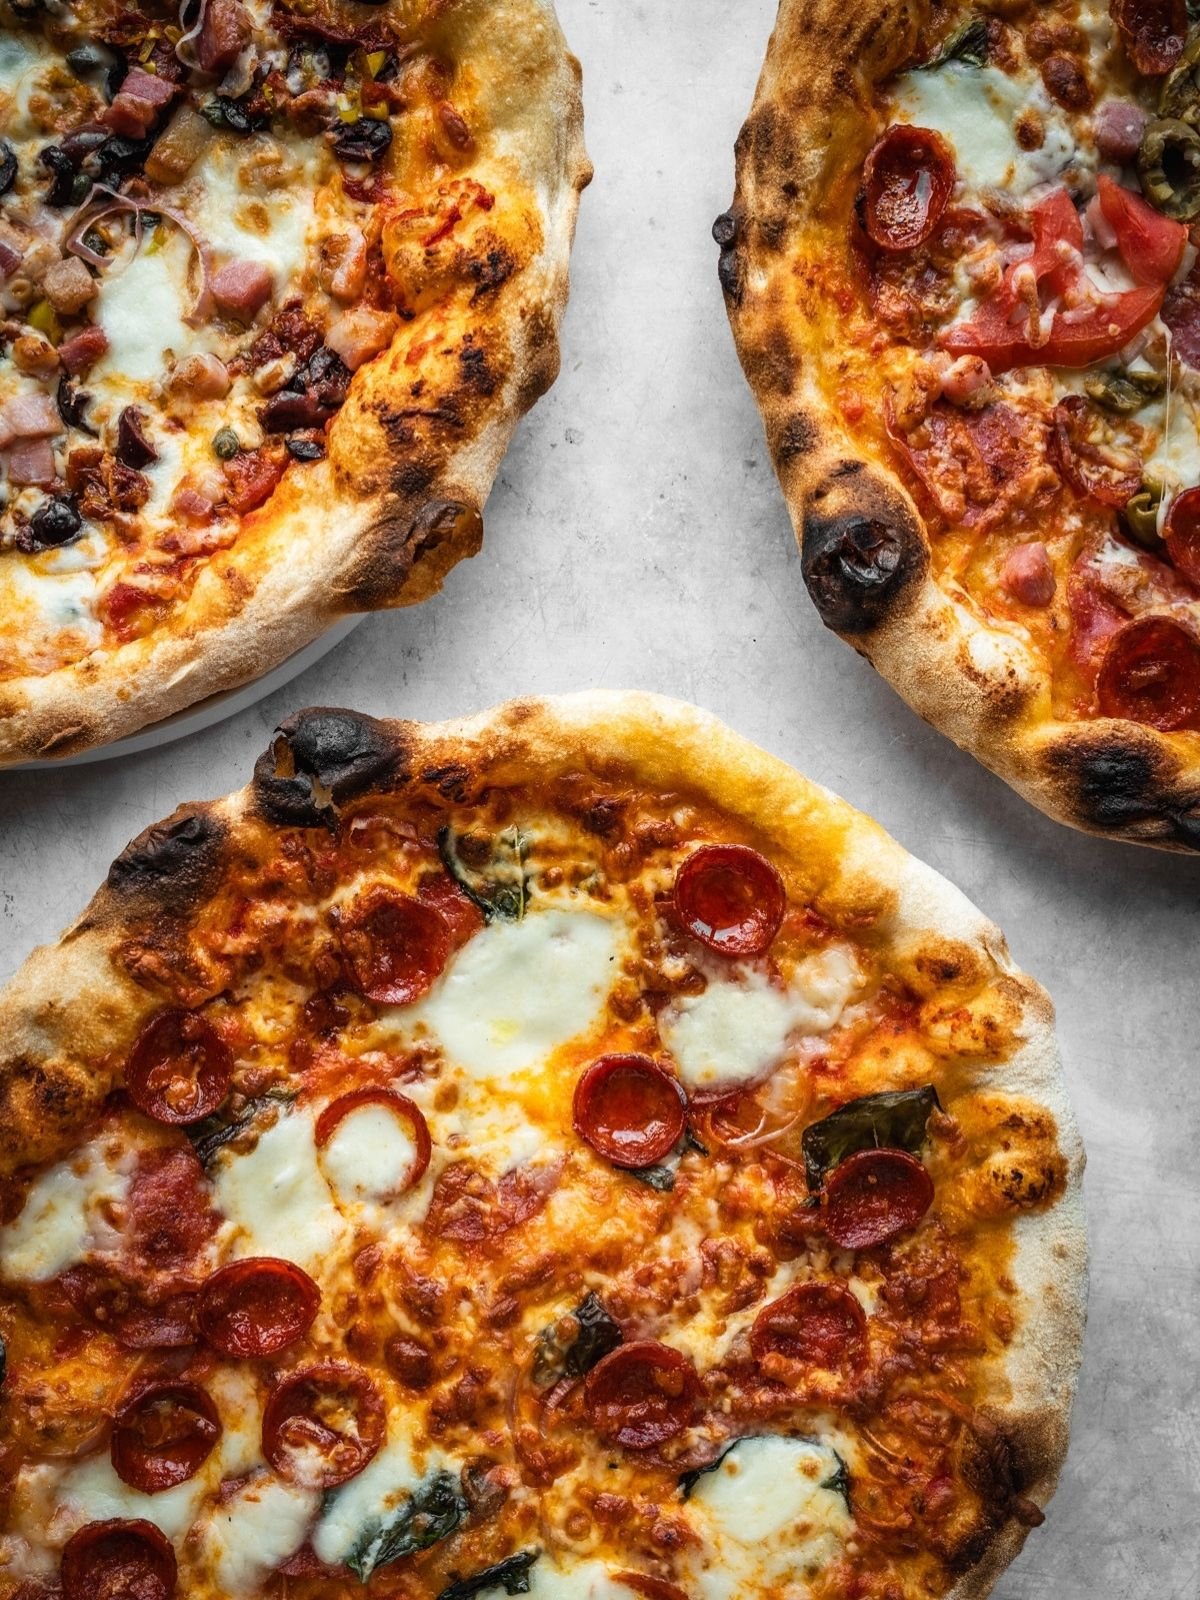
Table of Contents
- Why This Recipe Works
- What is Biga
- Ingredients
- Step by Step Video
- How to Make this Neapolitan Style Pizza Dough Recipe
- Sequence of Events and Timing Schedule
- Special Equipment
- Expert Tips for the Dough
- Expert Tips for Shaping the Pie
- Recipe FAQs
- Other Baking Recipes
- Overnight Biga Neapolitan Pizza Dough Recipe
This dough does take some time to prepare, but I have made it easy by including a schedule and sequence of events for you. There is also a video that goes through all the steps and also how to shape and dress the pizza before firing it into the oven.
This is a comprehensive post! If you just want to get to the recipe itself, hit the Jump to Recipe button above. But I really think you should read through if you want to be successful.
Adapted from the OONI Neapolitan pizza dough recipe, my recipe has been adjusted slightly. I have tested this recipe a half dozen times and can confirm that it works!
Why This Recipe Works
- Effortless artisan flavor: The biga preferment does most of the heavy lifting overnight, so the dough develops incredible flavor and structure with minimal work. This is the only way I’ll make pizza dough now.
- Perfect for pizza night: Prep it the day before and it’s ready to go the next evening. Great for weekend pizza parties or an easy dinner win. You can even freeze the dough balls and use them in a pinch on another day.
- Flexible pairing: This dough works beautifully with classic pizza toppings, fresh mozzarella, veggie combos, or even creative white pizzas with ricotta and seasonal greens.
What is Biga
Biga (sometimes called a biga dough)is a type of preferment, a mixture of flour, water, and yeast that is allowed to ferment before being turned into the final dough.
This method hails from Italy and is especially common in traditional bread and pizza making. Biga is similar to a poolish (which you can learn about in my Tuscan Schiacciata Flatbread recipe) or sourdough starter, but is typically drier and more firm in consistency.
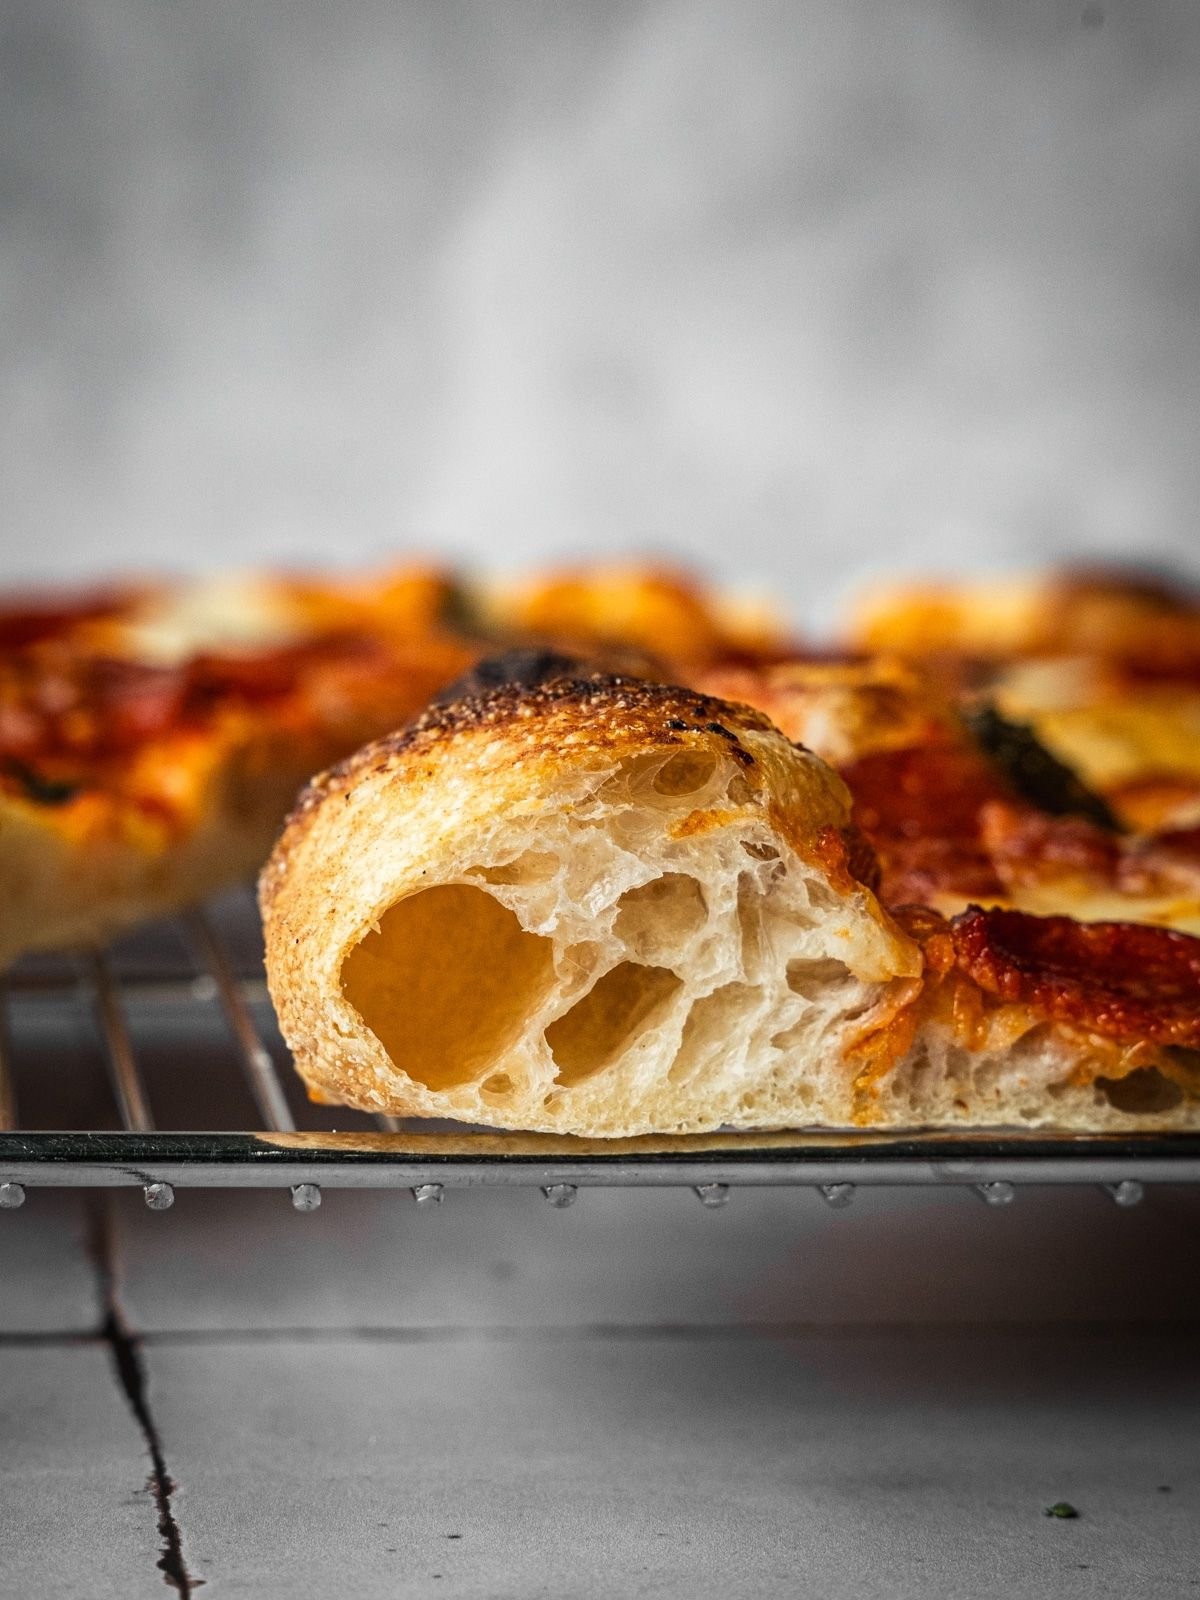
Historically, bakers developed biga to enhance the flavor, aroma, and shelf life of their baked goods without relying solely on commercial yeast. By letting the biga ferment slowly, usually for 16 to 18 hours, it builds complex flavors and strengthens the dough’s gluten structure. This means a better rise, airier crumb, and that sought-after chewy texture with just the right amount of tang.
Fermentation also makes the dough easier to digest, as the long rest time allows enzymes and friendly bacteria to break down some of the gluten and starches. The result? A tastier, more artisanal pizza base that’s well worth the wait.
Ingredients
As you’ll see, this recipe doesn’t need any fancy ingredients. But I do highly recommend that you use Italian pizza flour (Typo 00). Here’s what you will need:

- Flour: Use Type or Typo 00 flour only (also called double zero flour). This traditional Italian pizza flour yields the best results, but you can sub with all purpose flour or bread flour in a pinch.
- Yeast: I recommend using instant yeast because you can just add it directly to the Biga mixture without having to pre-bloom it. If you only have active dry yeast, you will need to add it to the water first before mixing your Biga. You can also use fresh yeast (weigh about 3 times as much fresh yeast vs instant).
- Semolina Flour: Used for dusting; adds a nice texture and prevents sticking.
Refer to the recipe card at the bottom of this post for a full list of ingredients and quantities.
Step by Step Video
How to Make this Neapolitan Style Pizza Dough Recipe
Okay, you ready? I recommend you read through all the steps and look closely at the photos so that you can be successful. And watch the video! Alright, Andiamo!
Prepare the Biga and First Rise
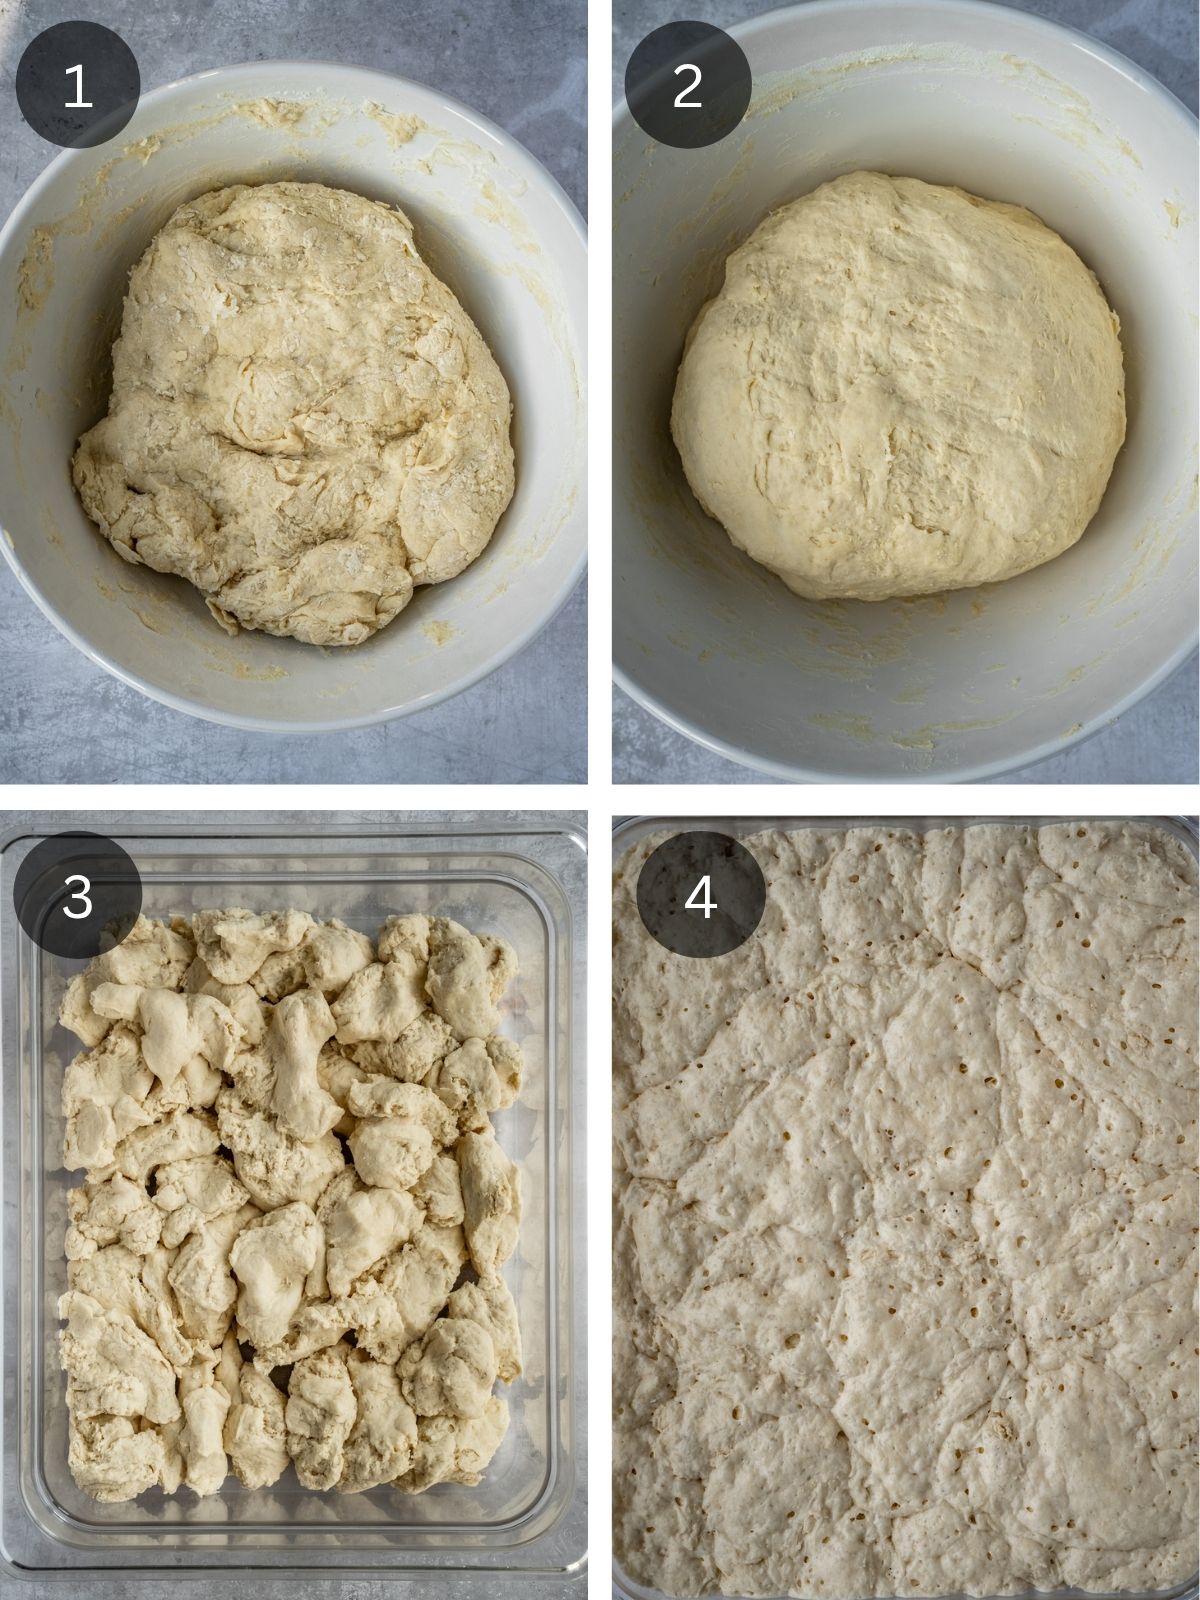
Step 1. Make the Biga. In a large bowl, combine flour, yeast, and water. Mix until the flour is just hydrated. Start with a fork or dough whisk, then switch to your hands. It’ll be tough; just do your best to hydrate it all (Images 1-2).
Step 2. Proof. Tear off golf ball-sized pieces of the biga and place them in a single layer in a large airtight container, dough tub or tall-sided baking dish (Image 3). It will rise quite a bit. Cover with a lid or plastic wrap and let it sit on the counter for 16–18 hours. The biga will be risen and you should see lots of air bubble (Image 4).
Season and Knead the Dough
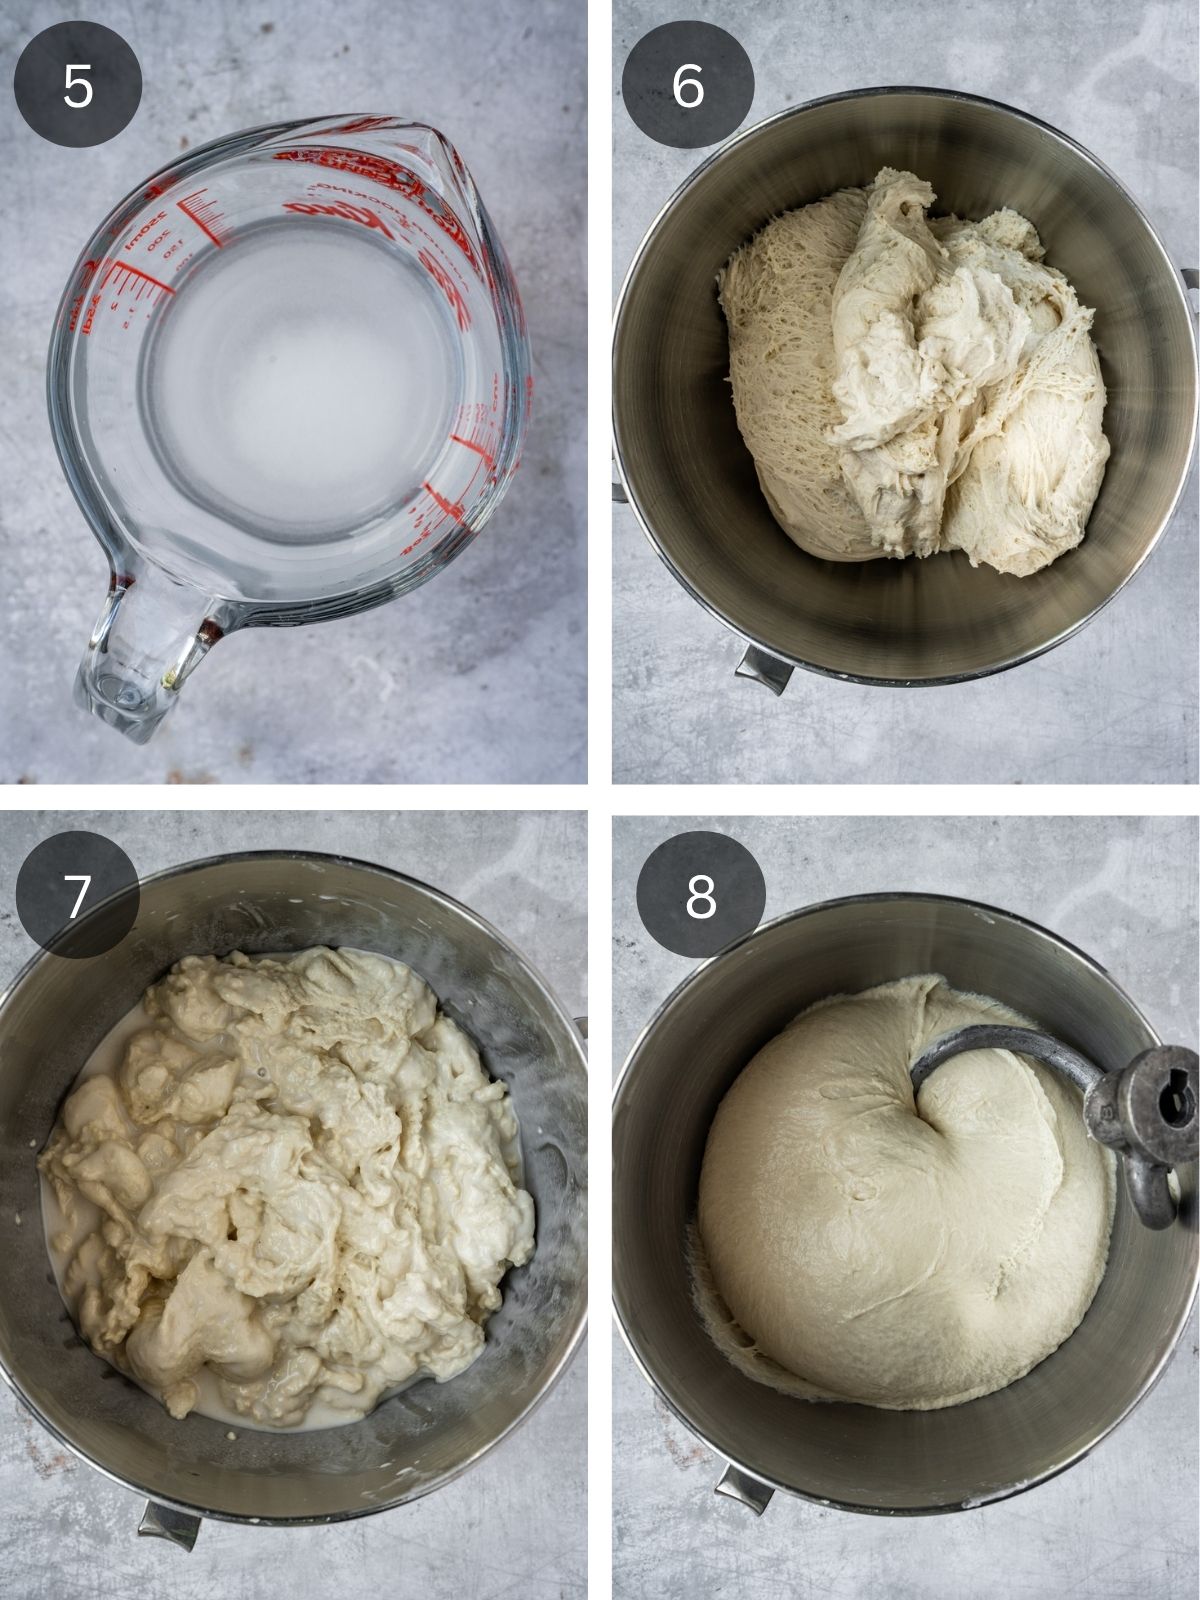
Step 3. Make Salt Water. The next day, dissolve salt in lukewarm water in a measuring cup (Image 5).
Step 4. Season. Transfer the prepared biga to your stand mixer bowl (Image 6). Pour in the salted water. Use your hands to pinch and incorporate the water into the biga until mostly absorbed. It doesn’t need to be perfect (Image 7).
Step 5. Knead: Attach the dough hook and knead on medium speed until soft and supple (Image 8). This should take about 10 minutes.
Final Knead and Second Rise
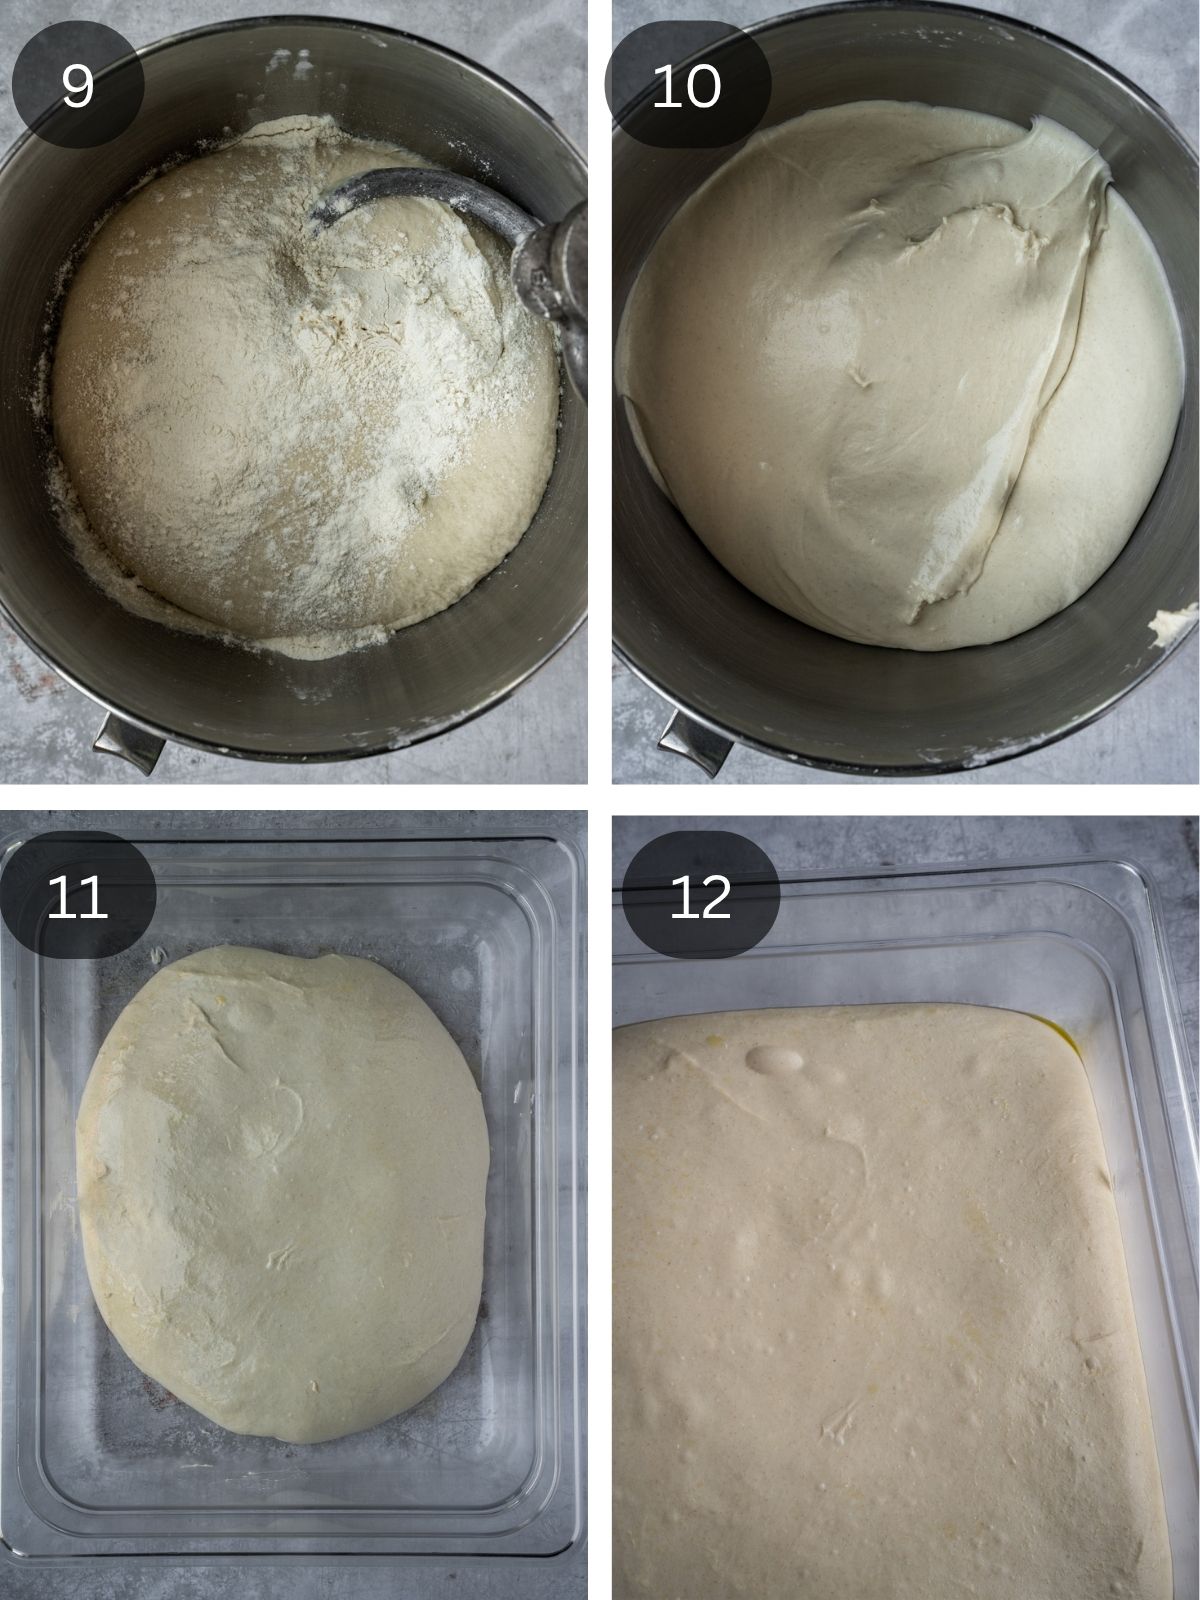
Step 6. Add Flour. Add more flour to feed the yeast (Image 9). Continue kneading on medium speed for another 5–8 minutes. You want the dough to release from the sides of the bowl as it kneads, so push the speed up slowly as needed. The dough will be loose and sticky, which is totally fine and expected. At this point, you can perform a “window pane test”. Grab a small amount of dough and try to gently stretch it. It should stretch without breaking, forming a thin “window pane” that light will come through. This means your dough has been kneaded sufficiently (Image 10).
Step 7. Second Rise. Lightly oil an airtight container and place the dough inside (Image 11). Let it rest on the counter for 1.5 hours, then refrigerate for another 1.5 hours (Image 12).
Portion, Shape and Final Rise
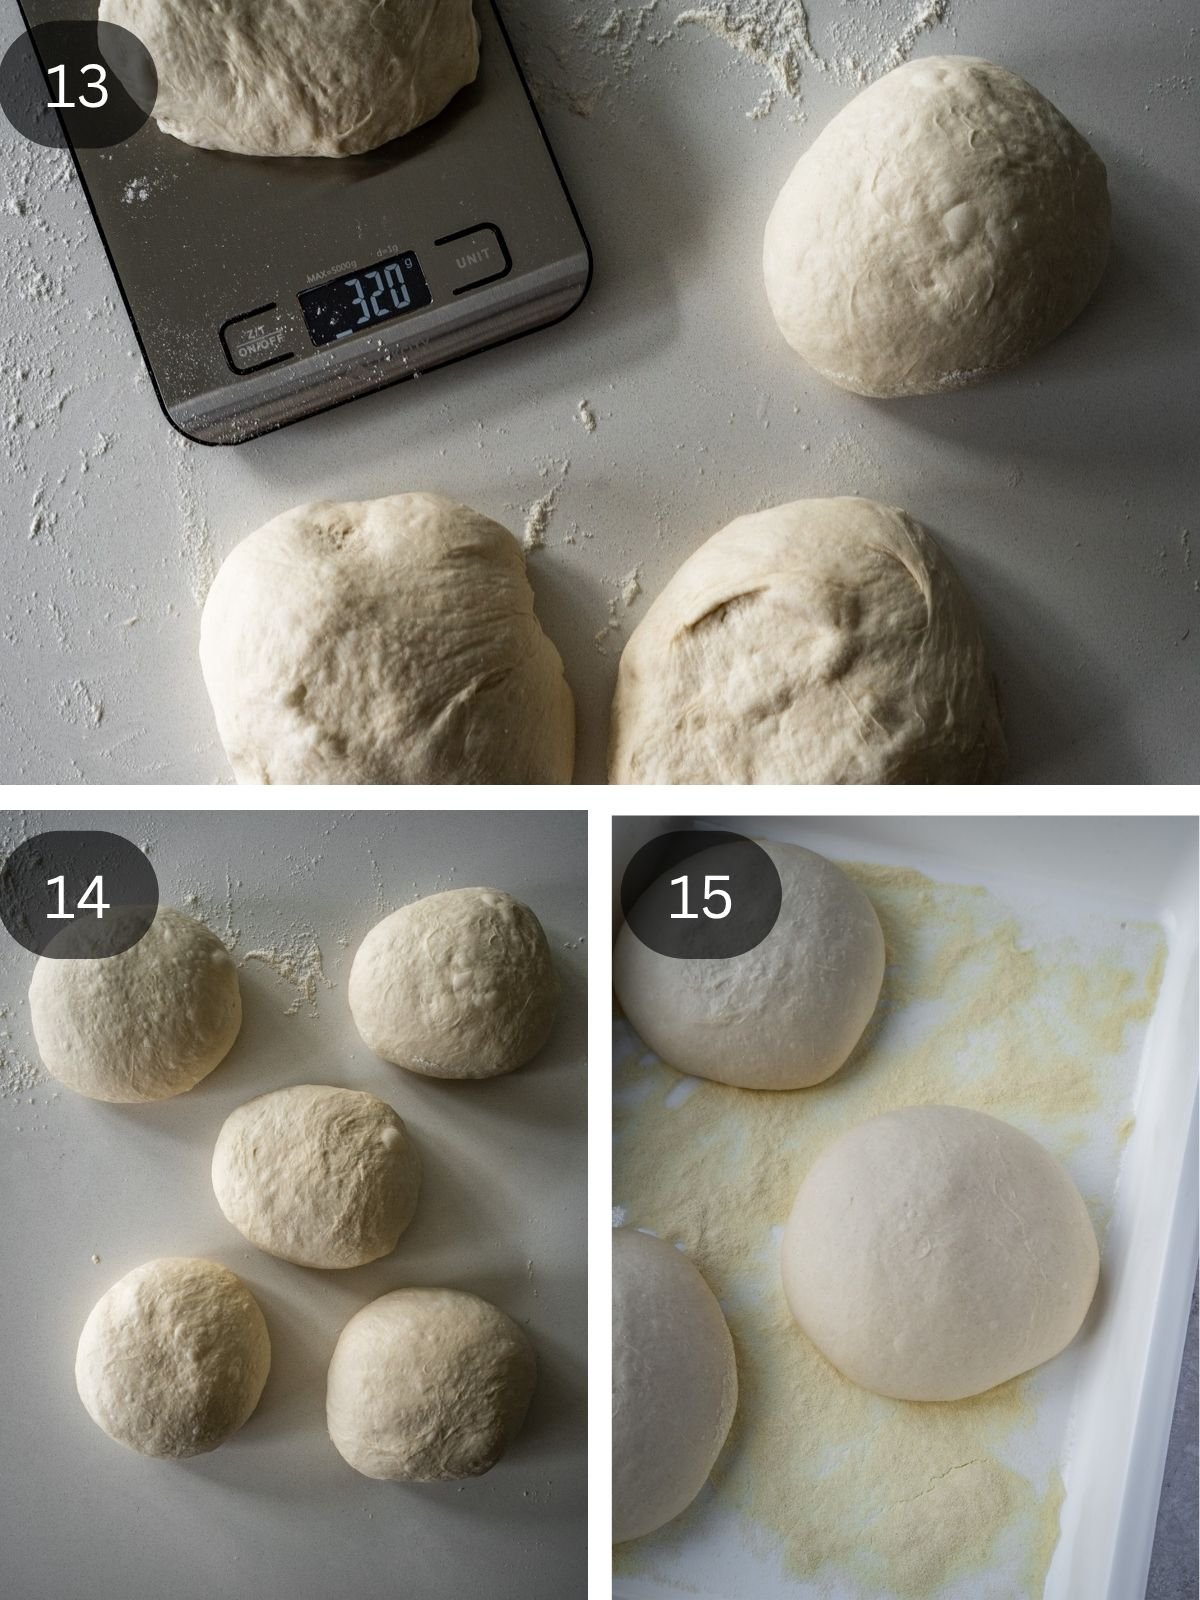
Step 8. Portion. Turn the proofed dough onto a floured work surface. Using a scale, divide into 5 pieces for larger pizzas or 6 pieces for smaller individual pizzas (Image 13).
Step 9. Form. Shape each portion into a tight ball, seam side down (Image 14).
Step 10. Final Rise. Dust a proofing box (or baking sheet) with semolina and arrange dough balls with at least 3 inches of space between them. Cover with plastic wrap and a towel. Let rise for 4 hours before using (Image 15).
Sequence of Events and Timing Schedule
Want to time your pizza-making perfectly? Here’s a sample timeline to have your Neapolitan pizzas hot and ready by 7:00 PM on Day 2:
- Day 1 – 6:00 PM – Mix the biga and set it in an airtight container on the counter to ferment (Steps 1 and 2)
- Day 2 – 11:00 AM – Season and knead the Biga into pizza dough (Steps 3-6).
- Day 2 – 11:30 AM – Second rise: Place the dough on the counter to rest for 1.5 hours (Step 7).
- Day 2 – 1:00 PM – Second rise: Transfer dough to the fridge to rest for 1.5 hours (Step 7).
- Day 2 – 2:30 PM – Remove dough from the fridge and divide into balls (Steps 8-9).
- Day 2 – 3:00 PM – Final rise. Place dough balls in proofing boxes or trays and let them rise for 4 hours (Step 10).
- Day 2 – 7:00 PM – Fire up your oven or pizza oven and bake your pizzas!
Special Equipment
Now, you don’t need to go out and buy new tools and equipment to make this recipe. You can probably find what you need right at home. But if you wanted to use the equipment I use, I am including a handy list for you right here:
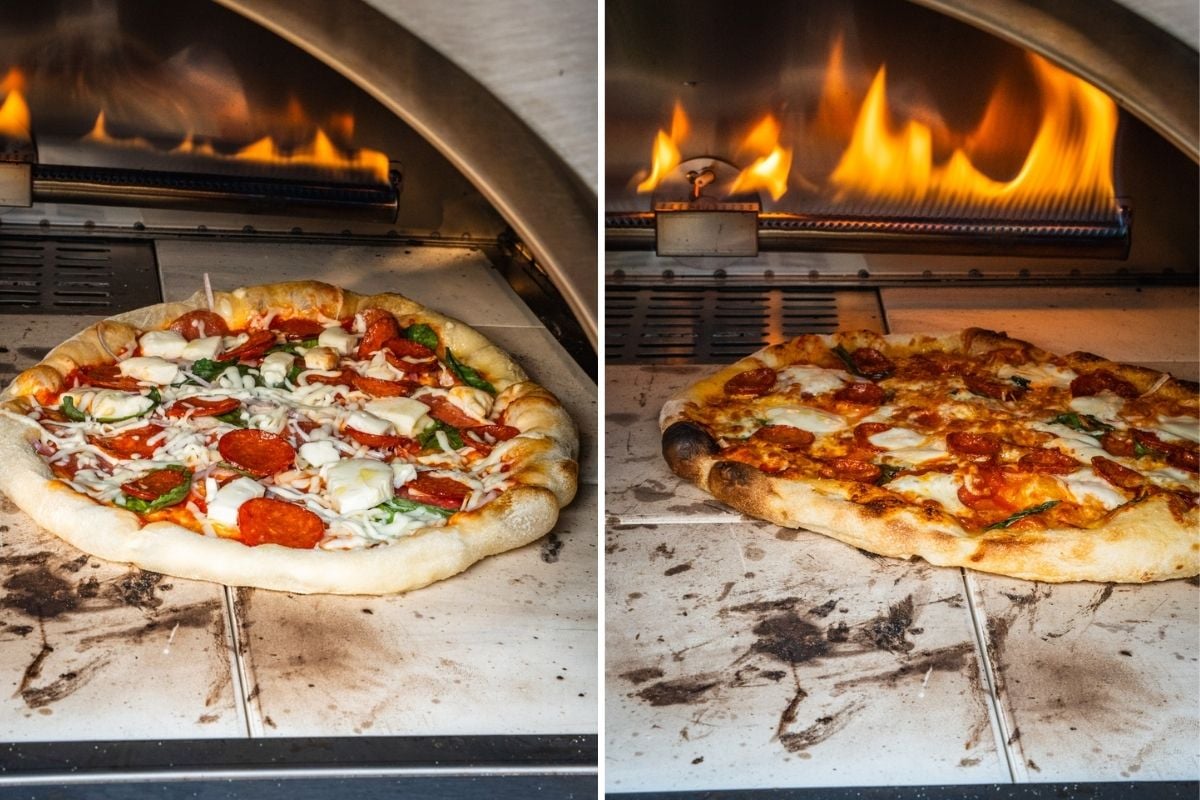
When it comes to cooking your pie, you can use a home oven with a pizza stone or a dedicated pizza oven.
Expert Tips for the Dough
- Don’t stress about perfect hydration when mixing the biga. Imperfect is fine. This recipe is about 62% hydration. As you get more comfortable with making dough this way, you’ll want to start experimenting with hydration levels. To calculate hydration: divide the weight of the water by the weight of the flour and multiply by 100. For example, if your dough has 700 grams of water and 1000 grams of flour, the hydration is 70%. Some people prefer lower hydration (65-70%) while more experienced bakers prefer high-hydration doughs of up to 75% or more. Start low. Work your way up. It’s what I did.
- Use a kitchen scale to portion out dough balls evenly. It makes a big difference and just keeps your pizzas even.
- Semolina keeps the dough from sticking and adds a beautiful texture to the crust. Don’t sub for white flour. Semolina makes your life easier. It’s also used on the pizza peel to make launching your pizza into the oven easier.
Expert Tips for Shaping the Pie
Turning your proofed dough ball into a perfect pizza dough base is all about gentle handling and working with the dough, not against it:
- Work on a lightly floured surface: Avoid incorporating too much flour while shaping the pie, which can toughen the pizza crust.
- Start from the center: Press your fingertips into the middle of the dough ball, working outward in a circular motion to define the crust. Leave about 1 inch around the edges untouched to form the cornicione (the puffy edge).
- Use gravity to your advantage: Gently lift the dough and let it stretch by rotating and letting the edges hang. No need to toss in the air unless you’re confident!
- Avoid the rolling pin: It will press out all the lovely gas bubbles you’ve developed. Stick to hand stretching for the best texture.
- Sauce: Use a great-tasting tomato sauce base (like my Roasted Tomato Sauce or Homemade Marinara). You can also just hand-crush some whole canned San Marzanos.
- If using a regular oven, I highly recommend using a baking steel or a baking stone. It’ll be the best way to replicate a traditional pizza oven. We all love that crispy crust. No soggy bottoms here. I make my pizza in my outdoor wood-fired oven most of the year, but come wintertime, I have to make do with my indoor oven.
Recipe FAQs
Yes! You can prepare the dough balls and keep them in the fridge for up to 24 hours after shaping. Just bring them back to room temp for an hour before baking.
Absolutely. After shaping the dough balls, freeze them on a tray, then transfer to freezer bags. Thaw frozen dough balls in the fridge overnight and bring to room temperature before baking.
Other Baking Recipes

If you make this Overnight Biga Preferment Neapolitan Pizza Dough Recipe or any other baking recipes on Urban Farm and Kitchen, please take a moment to rate the recipe ⭐⭐⭐⭐⭐ and leave a comment below. It’s such a help to others who want to try the recipe.
For more Urban Farm and Kitchen, follow along on Instagram, Facebook, and Pinterest, visit the Urban Farm Shop, or subscribe for new posts via email.
Overnight Biga Neapolitan Pizza Dough Recipe
Equipment
- Dough Whisk optional
- Half-Size 4” Deep Food Storage Container optional, or use any large airtight container
- Pizza Dough Proofing Boxes optional
Ingredients
For the Biga Preferment
- 1000 grams Type 00 Flour
- 1.3 grams Instant yeast – about ¼ tsp
- 540 grams Room temperature water – about 2¼ cups
Final Dough
- 22 grams Kosher salt – about 1½ tbsp
- 100 grams Warm water – ¼ cup + 3 tbsp
- 20 grams Flour (could be Typo 00 or just All Purpose) – about 2 tbsp
For Oiling and Dusting
- Olive oil
- Semolina flour
Instructions
Prepare the Biga and First Rise
- Make the Biga. In a large bowl, combine 1000 grams Type 00 Flour, 1.3 grams Instant yeast, and 540 grams Room temperature water. Mix until the flour is just hydrated. Start with a fork or dough whisk, then switch to your hands. It’ll be tough; just do your best to hydrate it all.
- Proof. Tear off golf ball-sized pieces of the biga and place them in a single layer in a large airtight container, dough tub or tall-sided baking dish (Image 3). It will rise quite a bit. Cover with a lid or plastic wrap and let it sit on the counter for 16–18 hours. The biga will be nice and bubbly.
Season and Knead the Dough
- Make Salt Water. The next day, dissolve 22 grams Kosher salt in 100 grams Warm water in a measuring cup.
- Season. Transfer the prepared biga to your stand mixer bowl (Image 6). Pour in the salted water. Use your hands to pinch and incorporate the water into the biga until mostly absorbed. It doesn’t need to be perfect.
- Knead: Attach the dough hook and knead on medium speed until soft and supple. This should take about 10 minutes.
Final Knead and Second Rise
- Add Flour. Add 20 grams Flour (could be Typo 00 or just All Purpose). Continue kneading on medium speed for another 5–8 minutes. You want the dough to release from the sides of the bowl as it kneads, so push the speed up slowly as needed. The dough will be loose and sticky, which is totally fine and expected. At this point, you can perform a “window pane test”. Grab a small amount of dough and try to gently stretch it. It should stretch without breaking, forming a thin “window pane” that light will come through. This means your dough has been kneaded sufficiently.
- Second Rise. Lightly oil an airtight container and place the dough inside. Let it rest on the counter for 1.5 hours, then refrigerate for another 1.5 hours.
Portion, Shape and Final Rise
- Portion. Turn the proofed dough onto a floured work surface. Using a scale, divide into 5 pieces for larger pizzas or 6 pieces for smaller individual pizzas.
- Form. Shape each portion into a tight ball, seam side down.
- Final Rise. Dust a proofing box (or baking sheet) with semolina and arrange dough balls with at least 3 inches of space between them. Cover with plastic wrap and a towel. Let rise for 4 hours before using.
Video
Notes
-
- Flour: Use Type or Typo 00 flour only. This traditional Italian pizza flour yields the best results, but you can sub with all-purpose flour in a pinch.
-
- Yeast: I recommend using instant yeast because you can just add it directly to the Biga mixture without having to pre-bloom it. If you only have dry active yeast, you will need to add it to the water first before mixing your Biga. You can also use fresh yeast (weigh about 3 times as much fresh yeast vs instant).
-
- Semolina Flour: Used for dusting; adds a nice texture and prevents sticking.
- For 67% hydration, add 50 grams of water
- For 70% hydration, add 80 grams of water
- Use a kitchen scale to portion out dough balls evenly. It makes a big difference and just keeps your pizzas even.
- Don’t stress about perfect hydration when mixing the biga. Imperfect is fine. As you get more comfortable with making dough this way, you’ll want to start experimenting with hydration levels. To calculate hydration: divide the weight of the water by the weight of the flour and multiply by 100. For example, if your dough has 700 grams of water and 1000 grams of flour, the hydration is 70%. Some people prefer lower hydration (60-65%) while more experienced bakers prefer higher hydration of up to 70% or more. Start low. Work your way up. It’s what I did.
Nutrition
Nutrition information is automatically calculated, so should only be used as an approximation.
 Like this recipe? Rate & comment below!


This is a great recipe! It turned out very well for me. Lots of spring, amazing crust.
My only question is why break the Biga into pieces? I left it whole.
Thanks for sharing.
Glad you liked the recipe. I break it into pieces so that I can get it into a single layer. You also get a more even expansion this way, as the biga works its way out and fills in the air pockets. Is it necessary? Probably not. It is a technique I learned a while ago and stuck with me.
How long do you cook it in the oven (regular indoor oven with pizza stone) and at what temperature?
This recipe is specifically for the dough. But to cook the pizza in an indoor oven with pizza stone, I would crank up the heat to the max (usually 500F). Let the stone preheat for at least 15 minutes after the oven has reached temp. Then slide the pizza and cook it until the crus tis browned, the cheesy is melty and charred. The time will depend on your oven, how many toppings you put on, etc.