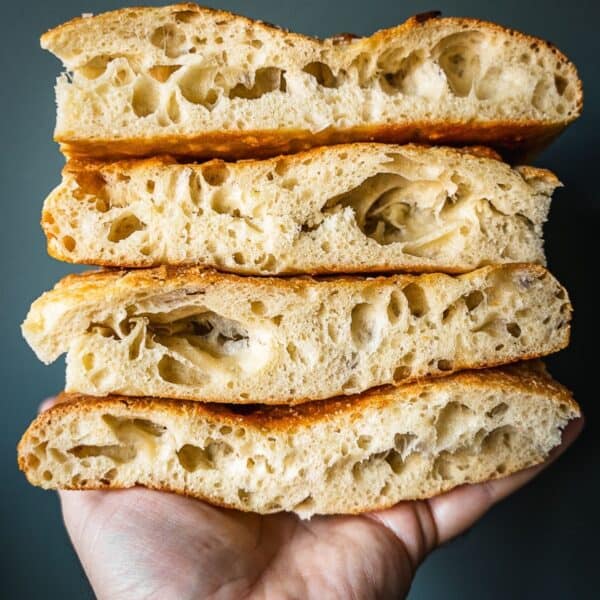
Schiacciata is a flatbread from Tuscany that is similar and yet different from focaccia. It has a crispy exterior and soft airy interior making it perfect for snacking or for slicing open and stuffing with your favorite sandwich toppings.
This is an incredibly simple bread recipe and uses pantry staple ingredients like flour, yeast, salt, olive oil, and water. I am using a pre-fermented dough recipe here which makes this bread more flavorful and easier to digest.

Table of Contents
What is Schiacciata?
Schiacciata (pronounced ski-a-chatta) is an Italian flatbread from Tuscany, Italy. The word “schiacciata” comes from the Italian verb “schiacciare,” which means “to crush” or “to flatten.” It is sometimes referred to as Tuscan focaccia outside Italy.
Traditionally, Tuscan schiacciata is made with simple ingredients: flour, water, yeast, salt, and olive oil. It is similar to focaccia (its more well-known flatbread counterpart from Liguria – try my Tomato Focaccia recipe too) but is usually thinner and lighter.
Schiacciata is often seasoned with olive oil, salt, and sometimes herbs like rosemary or sage. In some variations, it may also include other toppings such as olives, tomatoes, or onions.
Schiacciata Toscana can be enjoyed as a snack, appetizer, or accompaniment to a meal. It is commonly served in Tuscany and throughout Italy, either plain or with various toppings, and is a beloved part of Italian cuisine. You can slice it open and make a panino with it, as done in the legendary Florentine shop, All’antico Vinaio.
Ingredients
This recipe is as simple as it gets. Flour, water, yeast, salt and olive oil.

- Flour: For this recipe, I recommend using bread flour or other strong flour like typo 00. This will help with gluten formation and give the bread its chewy texture. You can also use All Purpose flour if that’s all you have. There’s also nothing stopping you from subbing some of the white flour with whole wheat if you wanted to.
- Yeast: I like to use instant yeast as it doesn’t need to be pre-bloomed in water. You can just mix it in with the flour and water and you’re all set. But feel free to use dry active yeast or even fresh yeast. When using fresh yeast instead of dry, use double the amount by weight. You will find many simple baking recipes that use commercial yeast on this website.
- Salt: I am using standard kosher salt in the bread recipe itself and flaky salt for the topping. But you can just use whatever salt you have.
- Olive oil: This recipe has very few ingredients so you might as well use the best you have. Extra virgin olive oil is a must.
See the recipe card for full information on ingredients and quantities.
The Poolish Method
The Poolish method is a pre-fermentation technique used in bread making to enhance flavor, texture, and overall quality of the final product. It involves creating a starter dough by combining equal parts of flour and water with a small amount of yeast, and then allowing it to ferment for a certain period of time before incorporating it into the main bread dough.
Benefits of the Poolish method include:
- Enhanced Flavor: The extended fermentation period of the Poolish allows for the development of complex flavors in the bread. The slow fermentation process breaks down the starches and proteins in the flour, creating aromatic compounds that contribute to the bread’s taste and aroma.
- Improved Texture: The Poolish method helps to improve the texture of the bread by increasing its hydration and promoting gluten development. This results in bread with a lighter, airier crumb and crispier crust.
- Extended Shelf Life: Bread made using the Poolish method tends to have a longer shelf life compared to bread made using conventional methods.
- Using Less Yeast: You only need a small amount of yeast when making this recipe.
How to Make this Schiacciata Recipe
This recipe is not too difficult and doesn’t require any fancy techniques. I recommend reading through the steps before starting to get comfortable with the recipe.

Step 1. Prepare the Poolish. In a small bowl, combine the lukewarm water, yeast and flour. Mix well (Image 1). Cover bowl with plastic wrap, and rest it on the counter at room temperature. You want the Poolish to develop for 12-14 hours. It should rise and become really loose and bubbly (Image 2).

Step 2. Prepare the dough. To a large mixing bowl, add your risen Poolish mixture. Add the water and mix well using a spoon or whisk (Image 3). Add the olive oil, flour and salt (Images 4-5). Mix well to combine. The dough will be shaggy (Image 6).

Step 3. Stretch and fold. Wet your hands lightly and grab the shaggy dough from the side and gently pull up and fold the dough over (Images 7-8). Turn the bowl 90 degrees and repeat the stretch and fold (Images 9-10). Turn and repeat. And finally, turn and repeat. You want to do 4 stretches and folds at this step. It’s ok if the dough is a bit messy looking. Cover with a towel and let it rest for 30 minutes on the counter (Image 11).
Step 4. Repeat the stretch and fold. Repeat the stretch and fold process, cover, and repeat in 30 minutes. You want to do at least 3 sets of stretch and fold (but ideally 4 sets over 2 hours).

Step 5. Transfer to a greased tray. Preheat your oven. Grease a baking tray and drop the dough in (Image 12). Gently try to bring the dough to the edges. If you meet some resistance, cover and let the dough rest for 45-60 minutes (Image 13). This will allow the dough to stretch naturally.
Step 6. Spread and dimple. Drizzle a little olive oil all over the dough and using your fingers dimple it all over, making sure to stretch it into the corners of the pan as you work. Sprinkle with a little sea salt (Image 14).
Step 7. Bake. Place the tray in your preheated oven and bake for 20-25 minutes until the crust is golden brown (Image 15).
Schiacciata Video Tutorial
Expert Tips
- Speed up the process. If you are not interested in using the Poolish method, you can skip it entirely and make your dough in a stand mixer with a dough hook attachment. In that case, I would recommend you use more yeast (a standard packet, or 2 ¼ teaspoons or 7 grams) and knead in the mixer for 7-10 minutes. Let the dough rise for an hour before moving it to the oiled baking sheet and baking.
- Use a sourdough starter. If you are a fan of sourdough baking, you can use a sourdough starter instead of the fresh yeast when making the pre-ferment.
- As thin as you like it. Use a smaller baking tray if you want taller Schiacciata. Use a larger baking sheet if you like it to be thin and crusty.
- Butter the pan. Buttering the pan before oiling it helps the dough release easily from the pan. It’s an optional step, but I recommend trying it.
- Avoid using a rolling pin. A rolling pin will squeeze all the air bubbles out of the dough, which is not what we want. Don’t use a rolling pin.
- Use a scale. Using a kitchen scale is the only way to ensure that your recipe is as close to mine as possible.
- Bake in the middle of the oven. This will give you an even browning and crust on both the top and bottom.

Recipe FAQs
The Poolish method is a pre-fermentation technique used in bread making to enhance flavor, texture, and overall quality of the final product. It involves creating a starter dough by combining equal parts of water and flour with a very small amount of commercial yeast, and then allowing it to ferment for a certain period of time before incorporating it into the main bread dough.
This bread is best enjoyed warm out of the oven, but you can certainly make it a day a head if you want to save time.
I recommend slicing it and storing it in a plastic bag on the counter for 1-2 days. If you find that it has softened too much, you can crisp it back up in a toaster oven. You can also freeze portions of Schiacciata in a freezer bag and reheat in the toaster oven as needed.
Schiacciata and focaccia are both Italian flatbreads, but they have some differences. Schiacciata is typically thinner and lighter than focaccia, with a texture that is often more airy and delicate. It is commonly seasoned with olive oil, salt, and sometimes herbs like rosemary or sage. Focaccia, on the other hand, tends to be thicker and more substantial, with a chewier texture. It is often topped with olive oil, salt, and various ingredients such as olives, tomatoes, onions, or cheese.
Other Baking Recipes
If you make this Schiacciata Bread Recipe or any other baking recipe on Urban Farm and Kitchen, please take a moment to rate the recipe ⭐⭐⭐⭐⭐ and leave a comment below. It’s such a help to others who want to try the recipe.
For more Urban Farm and Kitchen, follow along on Instagram, Facebook, and Pinterest, visit the Urban Farm Shop, or subscribe for new posts via email.
Schiacciata Bread Recipe (How to Make Tuscan Flatbread)
Equipment
Ingredients
For the Poolish Starter
- 1 cup Flour (all purpose, bread flour or typo 00) – 125 grams
- ½ cup Lukewarm water – 120 grams
- ¼ teaspoon Instant yeast
For the Dough
- 1 cup Lukewarm water – 240 grams
- 2 tablespoon Extra-virgin olive oil – 28 grams
- 3 cups Flour (all purpose, bread flour or typo 00) – 375 grams
- 2 teaspoon Kosher salt – 10 grams
For the Pan and Garnish
- Olive oil and flaky salt
Instructions
- Prepare the Poolish. In a small bowl, combine the 1 cup Flour (all purpose, bread flour or typo 00), ½ cup Lukewarm water and ¼ teaspoon Instant yeast. Mix well, cover the bowl with plastic wrap, and rest it on the counter at room temperature. You want the Poolish to develop for 12-14 hours. It should rise and become really loose and bubbly.
- Prepare the Schiacciata dough. The next day, to a large bowl, add your risen Poolish mixture. Add 1 cup Lukewarm water and mix well using a wooden spoon or whisk. Add 2 tablespoon Extra-virgin olive oil, 3 cups Flour (all purpose, bread flour or typo 00) and 2 teaspoon Kosher salt. Mix well to combine. The dough will be shaggy. Let the dough rest for 30 minutes.
- Stretch and fold. Wet your hands lightly and grab the shaggy dough from the side and gently pull up and fold the dough over. Turn the bowl 90 degrees and repeat. Turn the bowl 90 degrees and repeat the stretch and fold. Turn and repeat. And finally, turn and repeat once more. You want to do 4 stretches and folds at this step. It’s ok if the dough is a bit messy looking. Cover with a towel and let it rest for 30 minutes on the counter.
- Repeat the stretch and fold. Repeat the stretch and fold process, cover, and repeat in 30 minutes. You want to do at least 3 sets of stretch and fold (but ideally 4 sets over 2 hours).
- Transfer to a greased tray. Preheat your oven to 450F/230C. Grease a baking tray and drop the dough in. Gently try to bring the dough to the edges. If you meet some resistance, cover and let the dough rest for 45-60 minutes. This will allow the dough to stretch naturally.
- Spread and dimple. Drizzle the top of the dough with a little olive oil and using your fingers dimple it all over, making sure to stretch it into the corners of the pan as you work. Sprinkle with a little sea salt.
- Bake. Place the tray in your preheated oven and bake for 20-25 minutes until the crust is golden brown. Cool on a wire rack for at least 20 minutes before enjoying.
Video
Notes
- Flour: For this recipe, I recommend using bread flour or other strong flour like typo 00. This will help with gluten formation and give the bread its chewy texture. You can also use All Purpose flour if that’s all you have.
- Yeast: I like to use instant yeast as it doesn’t need to be pre-bloomed in water. You can just mix it in with the flour and water and you’re all set. But feel free to use active dry yeast or even fresh yeast. When using fresh yeast instead of dry, use double the amount by weight.
- Salt: I am using standard kosher salt in the bread recipe itself and flaky salt for the topping (coarse sea salt works well). But you can just use whatever salt you have.
- Olive oil: This recipe has very few ingredients so you might as well use the best you have. Extra virgin olive oil is a must.
Nutrition
Nutrition information is automatically calculated, so should only be used as an approximation.
 Like this recipe? Rate & comment below!


I just made this bread, and it came out awesome! I immediately made a sandwich with Italian cold cuts and provolone, and was in heaven (or Italy). I will freeze some slices and hope that they do well. Thanks for a great recipe!