If you know, you know. Anyone that grew up in or visited Montreal knows about Montreal bagels and all their glory. This is a step-by-step recipe for those that are homesick and craving a taste of home. For me, these are simply the best bagels ever!

Ok, so first of all, this is not an authentic Montreal bagel recipe (but it’s pretty close). That’s because most home cooks simply don’t have a woodfired oven. We have to settle for our standard ovens. Based on the rave reviews on our YouTube video (linked below), it seems like these bagels are pretty close to the original.
If you are ever in Montreal, I recommend you check out St-Viateur Bagel or Fairmont Bagel for real deal wood fired bagels.
A little history
What makes Montreal bagels so special and different from their New York City cousins?
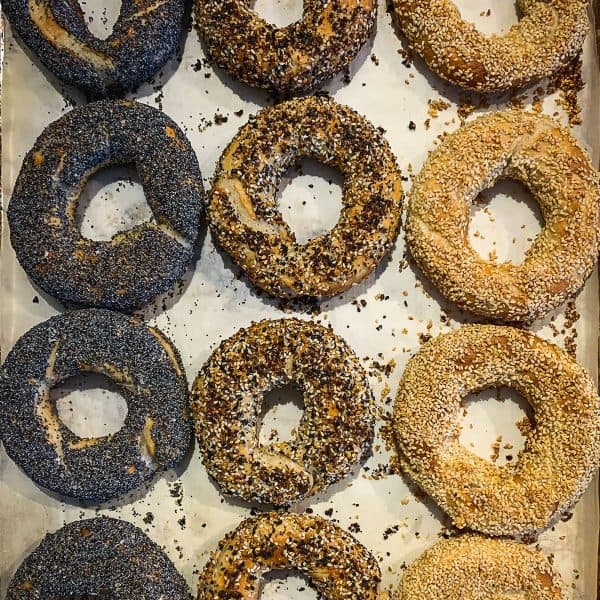
- Montreal bagels are typically hand rolled, resulting in uneven and misshapen bagels (we want this!) with a larger hole!
- They are dipped in boiling water spiked with honey prior to baking
- Woodfire is the go to cooking method, which gives these bagels a hint of smoke flavor.
Traditional recipes include malt and eggs but I developed this recipe for home cooks who probably don’t have malt syrup in their pantries. The malt syrup is important if you are looking to follow a traditional recipe.
Montreal-style bagels are sweet, chewy and not too salty. Don’t expect them to taste like a standard New York bagel.
Ingredients
For this recipe, you will need the following ingredients:
- Bread flour (All Purpose works as well, but bread flour with its higher protein content is the way to go)
- Active dry yeast
- Sugar
- Olive oil
- Salt
- Water
- Honey
- Toppings (sesame seeds, poppy seeds, everything bagel seasoning)
Equipment
Although the dough can be mixed by hand, I highly recommend you use a stand mixer if you have one.
I also recommend a kitchen scale to precisely weigh your ingredients.
Method
This is a detailed rundown of the recipe, from A to Z. I recommend you watch the YouTube video as well to help you get a better understanding of the process.
Prepare the dough
1. Yeast Mixture. This recipe starts with preparing the yeast mixture. In a Pyrex measuring cup, combine 415g (1 3/4 cups) of warm water with 1 packet of dry yeast (2 1/4 teaspoons) and 4 tablespoons of sugar. Mix well until the yeast dissolves and let the mixture activate for a few minutes.
2. Dry ingredients. Measure 700g (about 5 cups) of bread flour and add it to the bowl of a stand mixer. Add 1 teaspoon of salt to the flour.

3. Mix. Add your yeast mixture, followed by 2 tablespoons of olive oil.
4. Knead. With the dough hook attachment, run the stand mixer for 8-10 full minutes on low speed, until you have a nice, supple and soft dough.
NOTE: This recipe has been tested many times, but if you find your dough is too wet and not holding together, add more flour, 1 tablespoon at a time, until you get a doughball that is soft and yet holds its shape.
5. Rise. Transfer the dough ball to an oiled bowl (use canola oil or olive oil) and cover it with a clean tea towel.
6. Proof. Allow it to proof for 1 hour, or until doubled in size. You can also proof it in the stand mixer bowl itself, just make sure to oil your doughball well so it doesn’t stick.

Shape the bagels
7. Divide dough. When the dough has risen, punch it back and divide it into 12 equal pieces (about 100g each). Use your kitchen scale. Shape each piece into a tight ball and rest them on your kitchen counter for 5 minutes so that the gluten can relax.
8. Form your dough sausages. On an unfloured work surface, press the dough ball down and flatten it, bring the left and right sides of the dough circle together to create a rough rectangle. Starting from the bottom of the rectangle, roll upwards, so you end up with a tight cylinder, or small sausage-shaped dough piece. Rest your dough sausages for 5 minutes.

9. Roll your bagels. Roll each of the dough sausages into an 8-10 inch long piece. Bring both ends together and overlap them by an inch or two, and using pressure from your palms, continue rolling until both ends join together and you end up with your rolled bagel. Repeat for remaining bagels.
10. Rest. Rest your formed bagels on a floured surface for 30-60 minutes. Make sure to cover them with plastic wrap or a towel so they don’t dry out. We want them to rise again.
Boiling and baking the bagels
11. Prepare. Preheat your oven temperature to 450°F/230°C and prepare your topping stations. In small plates, place sesame seeds, poppy seeds or whatever your preferred bagel topping is. Honey bath. In a large pot (shallow wide preferred) filled with water, dilute 2 tablespoons of honey (you can use more here, up to 1/4 cup) and bring to a simmer.
12. Boil. Using your hands, gently drop a bagel into the hot water and honey bath. Cook the bagels for about 45 seconds on each side.

13. Dress. Use a slotted spoon to transfer the hot bagel to the topping station and apply your topping generously. Transfer to a prepared baking sheet (lined with parchment paper). Repeat this process with your remaining 11 bagels.
14. Bake. Bake the bagels in the preheated oven for 16 minutes. They should be nice and golden brown. Allow them to rest for at least 30 minutes before cutting into them. You can also transfer them to a cooling rack if you want to.
What to serve Montreal Style Bagels with
Enjoy with cream cheese, lox or your favorite vegetables, cheeses and spreads. You can enjoy them with hummus, mutabal or labneh balls. Serve them for breakfast along side some Turkish Eggs (Cilbir).
Storage
Store your bagels in a ziplock bag on your counter for up to 3 days. If you haven’t finished them by then, you can refrigerate for another 2 days or simply slice them and freeze them in a freezer bag. They will last in the freezer for several months.
Expert tips
- I recommend you use gloves (latex or nitrile) to help you handle the hot bagels. I also recommend you work with one bagel at a time, when you make this recipe for the first time. As you get more comfortable, you can boil the bagels 2 or 3 at a time.
- If using a convection oven, you don’t need to flip the tray. If using a conventional oven with no fan, turn the tray 180 degrees so get an even cook on all the bagles.
Video
I have a YouTube Video that shows takes you through this recipe:
FAQ
Montreal bagels are typically hand-rolled, resulting in uneven and misshapen bagels with large holes! They are dipped in boiling water spiked with honey before baking in a wood-fired oven. New York bagels are cakier in texture and have a small hole. Both are delicious.
There’s a lot of history behind why bagels are boiled. Technically, it is done so that the crust can set and also allow the toppings to stick before baking.
If you make these Montreal Style Bagels, please take a moment to rate the recipe and leave a comment below. It’s such a help to others who want to try the recipe. For more Urban Farm and Kitchen, follow along on Instagram, Facebook, and Pinterest, visit the Urban Farm Shop, or subscribe for new posts via email.
Other baking recipes you will enjoy
Star Bread with Cheese and Herbs
Cherry Tomato Puff Pastry Tart
Montreal Style Bagel Recipe
Equipment
- Stand Mixer
- Kitchen Scale – Use the scale for the water and flour. The rest of the ingredients can be measured out with cups and tea and tablespoons.
Ingredients
- 415 grams Water, warm – approx. 1 ¾ cups
- 2 ¼ teaspoon Dry yeast – 7 grams
- 4 tablespoon Sugar – 50 grams
- 700 grams Bread Flour (or All Purpose) – approx. 5 ½ cups
- 1 teaspoon Kosher salt – 6 grams
- 2 tablespoon Olive Oil – 30ml
Honey Water Bath
- ¼ cup Honey – 85 grams
- Enough water to fill a shallow pot
Toppings
- Sesame Seeds
- Poppy Seeds
- Everything Bagel Mix
Instructions
Prepare the dough
- Preparing the yeast mixture. In a Pyrex measuring cup, combine 415g (1 ¾ cups) of warm water with 1 packet of dry yeast (2 ¼ teaspoons) and 4 tablespoons of sugar. Mix well and let the yeast activate for a few minutes.
- Measure 700g (about 5 ½ cups) of bread flour and add it to the stand mixer bowl. Add 1 teaspoon of salt to the flour. Add your yeast mixture, followed by 2 tablespoons of olive oil.
- With the hook attachment, run the stand mixer for 8-10 minutes, until you have a nice and supple dough.
- NOTE: This recipe has been tested many times, but if you find your dough is too wet and not holding together, add more flour, 1 tablespoon at a time, until you get a doughball that is soft and yet holds its shape.
- Transfer the dough ball to an oiled bowl and allow it to proof for 1 hour, or until doubled in size. You can also proof it in the stand mixer bowl itself, just make sure to oil your doughball well so it doesn't stick.
Shape the bagels
- When the dough has risen, punch it back and divide it into 12 equal parts (about 100g each). Use your kitchen scale. Shape each piece into a tight ball and rest them on your kitchen counter for 5 minutes so that the gluten can relax.
- Form your dough sausages. Press the dough ball down and flatten it, bring the left and right sides of the dough circle together to create a rough rectangle. Starting from the bottom of the rectangle, roll upwards, so you end up with a tight cylinder, or small sausage-shaped dough piece. Rest your dough sausages for 5 minutes.
- Roll your bagels. Roll each of the dough sausages into an 8-10 inch long piece. Bring both ends together and overlap them by an inch or two, and using pressure from your palms, continue rolling until both ends join together and you end up with your rolled bagel. Repeat for remaining bagels.
- Rest your formed bagels on a floured surface for 30-45minutes (or less if your kitchen tends to be warm). Make sure to cover them with saran wrap or a towel so they don't dry out. We want them to rise slightly again.
Boiling and baking the bagels
- When your bagels are done proofing, it's time to preheat your oven and get your honey bath ready. Preheat your oven to 450F. In a shallow pot filled with water, dilute 2 tablespoons of honey (you can use more here, up to 1/4 cup) and bring to a simmer.
- Get your topping stations ready. In small plates, place sesame seeds, poppy seeds or whatever your preferred bagel topping is.
- Using your hands, gently drop a bagel into the hot water and honey bath. Cook the bagels for about 45 seconds on each side.
- Use a slotted spoon to transfer the hot bagel to the topping station and apply your topping generously. Transfer to a lined baking sheet. Repeat this process with your remaining 11 bagels.
- Bake the bagels in the preheated oven for 16 minutes. They should be nice and golden brown. Allow them to rest for at least 30 minutes before cutting into them.
Video
Notes
Nutrition
Nutrition information is automatically calculated, so should only be used as an approximation.
 Like this recipe? Rate & comment below!


Not sure if I let them rest too long, but as soon as I handled them to place in water they deflated,.
They only need to rest for a short while after forming. Also keep in mind that Montreal Style bagels are not fluffy. They should bake up a bit chewy so they don’t actually rise too much when you bake them.
Brilliant!
I have made this many times and always include the “dough sausage.” I am unsure of the purpose of this step, however. Is it to ensure the ends don’t taper off too much when rolling?
Also I noticed that the amounts suggested for doubling and tripling are not correct for the conversions. For example the water amount is 1 3/4 cup for each. Not a big deal but could be confusing.
Thank you!
Thanks for the feedback. This helps them keep a tight chewy crumb and not get too airy and fluffy like New York Style bagels.
The recipe multiplier works for the first set of numbers in the ingredient list. Special coding is required to update the annotations (in light gray). But thank you for the suggestion, I will look into a way it to scale up.
I LOVE this recipe! It has become a staple in our house. Once you get a hang of how to roll and form them, it’s effortless.
Thank you so much for the feedback!
Hi – also a former Montrealer and miss the bagels too! I made this recipe last night. Aside from the bagels I thinking rising too much once rolled – they where much bigger and rounder than yours after 45 minutes – not sure why. Lessen the rise time? Too warm? With the oven at 450F – my bagels were close to burnt after 15 minutes in the oven. The outside was a dark brown and crispy and the middle was “breadier” than expected as well. I will try again but wondering if I should lower the temp and shorten the rise time?
Could be that your kitchen was warm, maybe your years was very active. Once rolled, you let them rest for much less time. They will puff in the honey bath anyways, so if you do try the recipe again, cut the 45 minutes down to 10-15 mins. Every oven is different as well. Some will lean hotter, especially if you use the fan. Lower the oven temp to 400.
Excellent recipe. I have made it many times.
May I ask why you add olive oil to your recipe sir? Thank you for sharing this and my wife and I are eager to try it. We have experimented with other recipes in the past and they seem to fall short. I noticed that you add olive oil which was the major difference I noiticed. Does the oil impart some qualities? Thank you!
The oil helps the texture of the dough. You don’t have to use olive oil, you can use vegetable oil.
I followed the recipe exactly and the bagels turned out well. The flavour was perfect but mine were more on the bready side and I like them dense. What can I do to make them more dense? Thank you.
They probably proofed too much. This can depend on how warm your kitchen is. You can limit the rise by boiling them soon after rolling them.
Thank you Luay. This time I boiled and baked them immediately after shaping them (step 3) and they came out denser. Also, I am using bread flour instead of all purpose. Could that make a difference?
This worked perfectly the first time. Great flavour and excellent texture. Aside from a huge wood oven, the only thing different from the Montreal bagels I remember is no sourdough taste. My family wants them again and so do I.
Thank you for sharing your feedback!
Wow this recipe is amazing!! It tastes so darn close to St. Viateur’s bagels from Montreal! I constantly miss their bagels and nothing comes close in the city I live in. I am SO glad I found your recipe, and I didn’t use oil while proofing my dough but otherwise followed it exactly. It was so easy to follow and turned out amazing! I highly encourage everyone to give it a try.
So glad you loved it! -Luay
These were everything I was hoping for – after moving away from Montreal I’m always craving these bagels and this recipe was spot on!!
Thank you! I’m glad you loved them!