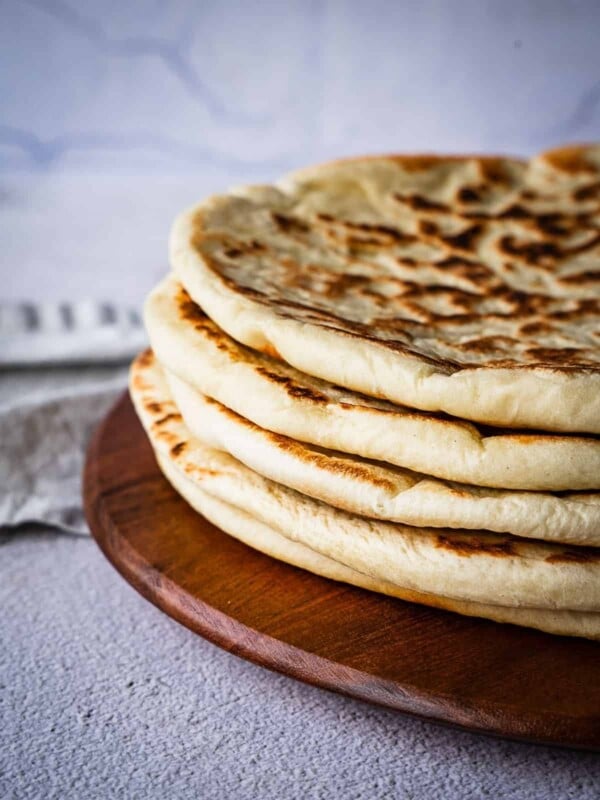
Making your own Lebanese Pita Bread is not as difficult as you may think! This recipe includes 3 different cooking methods to make this quintessential Levantine flatbread.

Table of Contents
What is Khubz?
Khubz (or Khubez) is the anglicized Arabic word for bread. It’s really as simple as that! The word Khubz refers to all types of bread, but in the traditional sense, it refers to Middle Eastern flatbread.
There are several types of yeasted bread found in the Levant (for example, Taboon, a Palestinian flatbread traditionally cooked in clay ovens or on stones).
This recipe is for thin pita bread that can be used to make wraps or for dipping into homemade hummus, roasted eggplant mutabal, galayet bandora, homemade labneh (and labneh balls), bread dipping oil, Mast-o Khiar (Persian cucumber yogurt dip), muhammara, Mafghoussa (labneh with butternut squash dip) and other dips.
This recipe is for the type of pita you find bundled in bags and sold in Middle Eastern markets or your local grocery store.
It is also the basis for other recipes like Fattet hummus and Eggplant Fatteh (a dish made by soaking crispy baked pita chips in hummus and tahini sauce). This recipe is featured in my What to Eat with Hummus (21 amazing ideas) post.
Even though I am calling this a Lebanese Pita Bread recipe, this type of flatbread is enjoyed throughout the Middle East. It’s a Levantine breakfast staple that can be eaten with Turkish Eggs, Musabaha (Creamy chickpeas) and Ful Medames.
Some call it Arabic Bread, some call it Syrian bread. No singular modern nation holds ownership over this type of flat bread. Enjoy it with Turkish Red Lentil Soup too!

Lebanese Pita vs Greek Pita
The word Pita has its origins in modern Greek. It’s related to the Turkish word, Pide which also means flat bread. Pita has been adopted as the de facto name for this type of bread in the West and in English-speaking countries. So how does Middle-Eastern pita differ from Greek?
Greek pita bread is typically thicker than Middle Eastern pita and can be split easily to create a pocket for all sorts of fillings like gyro meat or falafels. It can be wrapped to make chicken souvlaki wraps or cut into triangles and toasted for dipping. Greek pita tends to hold its shape more whereas Middle Eastern pita bread can fall apart if it’s not too fresh.
Both types of flatbreads are delicious and useful in their own right. At the end of the day, both cultures share so much in common that the differences are quite indistinguishable at times.
Ingredients
As with most basic bread recipes, the ingredients are simple and accessible. What’s important is the technique.

- Flour: This recipe uses a mixture of both all-purpose flour and whole wheat flour. You can adjust the ratio to suit your needs and taste or make the pita using only white flour (AP or bread flour).
- Yeast: I use instant yeast to make the recipe quickly (instant yeast doesn’t need to be pre-bloomed in water). But if you have Active dry yeast, feel free to use that. You’ll need to bloom it in water to activate it first.
- Olive oil: An important and traditional ingredient. You don’t need to use fancy extra virgin olive oil here. Any olive oil will do.
See the recipe card for full information on ingredients and quantities.
How to Make this Lebanese Bread Recipe
The first set of instructions will outline the mixing and shaping of the pita. You can then choose which baking method suits you most. I recommend using a pizza stone and oven as it will yield the best results.

Step 1. Mix. In a large bowl, combine the water, yeast and sugar (Image 1). Mix well. Add the olive oil, flour and salt. Using a wooden spoon, mix until shaggy (Image 2 and Image 3).
Step 2. Knead. Knead the pita dough on a clean work surface until you have a soft and supple dough ball (Image 4).

Step 3. Rise. Transfer the dough ball to an oiled bowl and cover with plastic wrap (Image 5). Let the dough rise in a warm place in your kitchen for 1 hour, until doubled, or overnight in the fridge (Image 6). If proofing in the fridge, allow the dough to come to room temperature before you proceed with the recipe.

Step 4. Form. Divide the pita bread dough into 8 equal pieces and shape into smaller dough balls (Image 7 and Image 8). Leave the dough balls to rest on your counter for 10 minutes, covered with a kitchen towel (Image 9).
Step 5. Roll out. Working with one dough ball at a time, roll it out into a thin disk about 1/8 of an inch thick using a rolling pin. The dough circle should be about 6-7 inches in diameter. You can roll the dough balls into discs as you bake them, or you can roll them all at once and keep them covered so they don’t dry out (Image 10).
Pita Baking Option 1: Oven Method with Pizza Stone
This is my preferred method.

- Preheat oven. Place your pizza stone on the middle rack of your oven and preheat it to 475F/240C (Image 11).
- Bake. Quickly transfer a dough disc to the hot pizza stone, spray the pita and the pizza stone with some water from a spray bottle to create a little steam, shut the oven door quickly (Image 12). If the pizza stone is warm enough, the pita should puff creating a large air pocket. Bake for 2-3 minutes until lightly browned. Flip and bake for another 30-45 seconds. The pita should remain mostly pale with some splotches of browning (Image 13).
- Keep warm. Using tongs, transfer the cooked pita to a tortilla warmer or a towel. Make sure to keep the cooked pitas covered so that they can soften before you eat them (Image 14).
Pita Baking Option 2: Oven Method with Baking Sheet
This method is almost identical to the one above but uses an inverted sheet pan instead. The benefit is that depending on the size of your oven and baking sheet, you can bake several pitas at a time.

- Preheat oven. Place an inverted sheet pan (or baking steel) on the middle rack of your oven and preheat it to 475F/240C (Image 15).
- Bake. Quickly transfer as many dough disks to the piping hot sheet pan as you can, leaving a few inches of separation between them, spray the pita and the hot pan with some water from a spray bottle to create a little steam, and shut the oven door quickly (Image 16). The pitas should puff creating a large air pocket. Bake for 2-3 minutes until lightly browned. Flip and bake for another 30-45 seconds. The pita should remain mostly pale with some splotches of browning (Image 17).
- Keep warm. Using tongs, transfer the cooked pita to a tortilla warmer or a towel. Make sure to keep the cooked pitas covered so that they can soften before you eat them (Image 18).
Pita Baking Option 3: Stove Top Method
This option is quick and easy, but will probably not yield pita bread that will puff up with a pocket. The flatbread will still be delicious but do keep that in mind.

- Warm Pan. Place a wide frying pan with lid on your stove set on medium-high heat. Carefully transfer a rolled-out pita to the pan, lightly mist with water from a pray bottle, and cover the pan to seal in the steam (Image 19).
- Cook. After 45 seconds, lift the lid. Flip the pita and wait another 30-45 seconds. The pita should not brown completely. Little brown spots are fine, but the flatbread itself should remain quite pale (Image 20 and Image 21).
- Keep warm. Transfer the cooked pita to a tortilla warmer or a towel. Make sure to keep the cooked pitas covered so that they can soften (Image 22).
Comparing All Three Methods
The pizza stone method yields the best pitas with a nice pocket. The inverted baking sheet method will yield decent pita bread, but the pocket may not be as pronounced as with the pizza stone. The pan method basically yields bread similar in texture and coloration to Naan or Taboon.
The pan method can be used if you want to make a Greek-style pita.

The Perfect Pocket
Ensuring that a pita bakes and creates a pocket involves a specific baking process that allows the dough to puff up and form an air-filled space inside. Here are some tips to help you achieve this:
- High Temperature: Preheat your oven to a high temperature, usually around 450-500°F (232-260°C). The high oven temperature is crucial for the rapid expansion of the dough. The high heat causes the water in the dough to turn into steam, creating a pocket inside the pita.
- Thin Dough: Roll out your pita dough thinly, usually about 1/8 to 1/4 inch thick. Thinner dough will puff up better in the high heat of the oven.
- Resting Time: Let the rolled-out dough rounds rest for a short period, about 5-10 minutes, before baking. This resting time allows the gluten in the dough to relax, and helps the dough rounds rise slightly, which helps in achieving the pocket during baking.
- Baking Surface: Place the rolled-out dough directly onto a hot baking surface. Traditionally, pitas are baked on a pizza stone, baking stone, baking steel, or a preheated baking sheet. The direct contact with the hot surface promotes rapid rising and puffing.

Expert Tips
- Use a Stand Mixer. If you’re not interested in kneading the Lebanese bread dough by hand you can use a stand mixer with dough hook attachment. A stand mixer can be great if you’re looking to double this recipe and make a large batch of Lebanese pita bread.
- Preheat your oven! A hot oven is the only way you’ll get the dough to puff up and create a pocket.
- Don’t overcook. Avoid the tendency to overcook the bread. Pita DOES NOT need to be golden brown! It should be pale in color with a few brown spots. This helps keep it pliable and soft.
- Cook it in a pizza oven. An outdoor pizza oven, whether gas or wood-fired, is an excellent way to prepare pita.
- Use a BBQ or Grill with a pizza stone. The pita can also be baked on a pizza stone in a bbq or grill.
- Go Greek! This homemade pita bread recipe can be adapted to make Greek pita. Simply roll out the pita to a thicker consistency to make a Greek-style pita.

Recipe FAQs
The exact origins of pita bread are unclear, but it has been a staple in Middle Eastern and Mediterranean cuisine for centuries. Pita bread’s invention is often attributed to various ancient cultures in the region, including ancient Egyptians and Mesopotamians, who were baking similar flatbreads as early as 2500 BCE. The modern version of pita bread, with its characteristic pocket, likely developed in the Mediterranean and Middle Eastern regions, where it has been enjoyed for generations.
Yes, you most certainly can. I recommend using a cover from another pan to help you seal in the steam as the pita bakes.
Baked Lebanese pita can be stored in a ziplock bag, plastic bag or an airtight container on the counter for up to 3 days. You can extend its life by refrigerating it for 3 more days or by freezing it for up to 6 months. Using parchment paper rounds or squares between layers of pita makes for easier defrosting.
Frozen pita can be brought to room temperature slowly on its own or reheated in a toaster oven. Keep in mind that frozen and defrosted pita will lose some of its pliability so I recommend using frozen pita for toasting into triangles and dipping into dips.
The Lebanese bread dough can be made 1-2 days ahead of time using the refrigerator-proofing method. This way, the dough rises very slowly allowing for the flavors to develop.
Other Levantine Baking Recipes
Levantine Recipes
Baking
Recipes
Baking
If you make this Lebanese Pita Bread recipe or any other Baking recipes on Urban Farm and Kitchen, please take a moment to rate the recipe ⭐⭐⭐⭐⭐ and leave a comment below. It’s such a help to others who want to try the recipe.
For more Urban Farm and Kitchen, follow along on Instagram, Facebook, and Pinterest, visit the Urban Farm Shop, or subscribe for new posts via email.
Lebanese Pita Bread (Traditional Khubz)

Equipment
- Baking stone, Pizza stone, or baking steel
Ingredients
- 1 cup Water – 240 grams
- 2 ¼ teaspoon Instant yeast – 1 packet / 7 grams
- ½ teaspoon Sugar – 2 grams
- 2 tablespoon Olive oil – 30ml
- ¼ cup Whole wheat flour – 35 grams
- 2 ½ cups All Purpose Flour – 350 grams
- 1 teaspoon Kosher salt – 5 grams
Instructions
Prepare the Dough
- Mix. In a large bowl, combine the water, yeast and sugar. Mix well. Add the olive oil, flour and salt. Using a wooden spoon, mix until shaggy.
- Knead. Knead the pita dough on a clean work surface until you have a soft and supple dough ball.
- Rise. Transfer the dough ball to an oiled bowl and cover with plastic wrap. Let the dough rise in a warm place in your kitchen for 1 hour (until doubled) or overnight in the fridge (if proofing in the fridge, allow the dough to come to room temperature before you proceed with the recipe).
- Form. Divide the pita bread dough into 8 equal pieces and shape into smaller dough balls. Leave the dough balls to rest on your counter for 10 minutes, covered with a kitchen towel.
- Roll out. Working with one dough ball at a time, roll it out into a thin round about 1/8 of an inch thick using a rolling pin. The dough circle should be about 6-7 inches in diameter. You can roll the dough balls into discs as you bake them, or you can roll them all at once and keep them covered so they don’t dry out. Make sure to give the discs a few minutes of rest before you bake, this helps the air bubbles form in the dough which will expand and form the pocket when baked.
Baking Option 1: Oven Method with Pizza Stone
- Preheat oven. Place your pizza stone on the middle rack of your oven and preheat it to 475F/240C.
- Bake. Quickly transfer a dough disc to the hot pizza stone, spray the pita and the pizza stone with some water from a spray bottle to create a little steam, shut the oven door quickly. If the pizza stone is warm enough, the pita should puff creating a large air pocket. Bake for 2-3 minutes until lightly browned. Flip and bake for another 30-45 seconds. The pita should remain mostly pale with some splotches of browning.
- Keep warm. Using tongs, transfer the cooked pita to a tortilla warmer or a towel. Make sure to keep the cooked pitas covered so that they can soften before you eat them.
Baking Option 2: Oven Method with Baking Sheet
- Preheat oven. Place an inverted sheet pan (or baking steel) on the middle rack of your oven and preheat it to 475F/240C.
- Bake. Quickly transfer as many dough disks to the piping hot sheet pan as you can, leaving a few inches of separation between them, spray the pita and the hot pan with some water from a spray bottle to create a little steam, and shut the oven door quickly. The pitas should puff creating a large air pocket. Bake for 2-3 minutes until lightly browned. Flip and bake for another 30-45 seconds. The pita should remain mostly pale with some splotches of browning.
- Keep warm. Using tongs, transfer the cooked pita to a tortilla warmer or a towel. Make sure to keep the cooked pitas covered so that they can soften before you eat them.
Baking Option 3: Stove Top Method
- Warm Pan. Place a wide frying pan with lid on your stove set on medium-high heat. Carefully transfer a rolled-out pita to the pan, lightly mist with water from a pray bottle, and cover the pan to seal in the steam.
- Cook. After 45 seconds, lift the lid. Flip the pita and wait another 30-45 seconds. The pita should not brown completely. Little brown spots are fine, but the flatbread itself should remain quite pale.
- Keep warm. Transfer the cooked pita to a tortilla warmer or a towel. Make sure to keep the cooked pitas covered so that they can soften.
Video
Notes
- Don’t skip the preheating process! Your oven must be pre-heated and if you’re using a pizza stone, let it pre-heat for an additional 10 minutes to get nice and hot.
- Thin Dough: Roll out your pita dough thinly, usually about 1/8 to 1/4 inch thick. Thinner dough will puff up better in the high heat of the oven.
Nutrition
Nutrition information is automatically calculated, so should only be used as an approximation.
 Like this recipe? Rate & comment below!


These pitas turned out wonderful, and are delicious with some homemade hummus! This was my first time making pitas.
I doubled this recipe and used my stand mixer. The double batch was too much for the mixer with my dough hook, so I split the dough in half to mix.
I cooked them on a pizza stone in the oven. My first pita wasn’t rolled out thinly enough, so it didn’t develop an air pocket, but learning as I went, and following your instructions produced the perfect pita.
I also made pita chips from some these pitas in my air fryer. They turned out perfect! These pitas, being thinner than a Greek pita, worked beautifully. The chips are crisp and also pair well with homemade hummus.
Thank you for guiding me on a culinary adventure!
Thanks for sharing your feedback, Rebecca!
We followed the recipe to a T, but unfortunately they did not puff at all. The second pan of bread, we upped the heat to 500* and left in for 4 minutes before flipping, but they were still flat. Tasted just fine, though.
Letting the dough disks rest for 15 minutes before baking will help create some air bubbles in the pita and when it hits the hot oven, the air bubbles will expand forming a pocket.