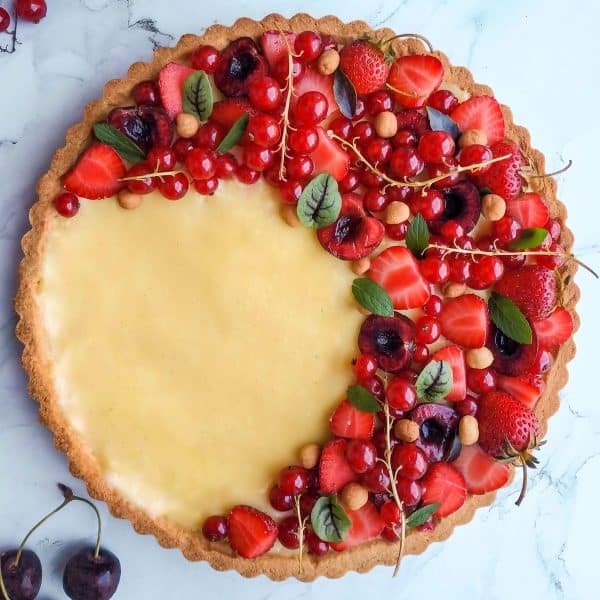
A versatile and easy to prepare recipe for fresh fruit tart with vanilla pastry cream. Make it your own with whatever fruit you have on hand in the fridge or garden.

A classic French fresh fruit tart (tarte au fruits) is something quite magical. The crispy shortbread crust, the sweet and thick pastry cream and the tangy fruit make this desert perfect for special (or not so special) occasions. I have made this recipe countless times. I’ve used my homegrown peaches, pears and plums. I’ve also made it with strawberries, raspberries and blueberries from the farmer’s market. In the dead of winter, I’ve made it with imported citrus (blood oranges, tangerines and grapefruit).
Preparing and baking the tart crust
The shortbread crust is the same as the one I use for my fully baked frangipane tart and is quite easy to make. You will need the following ingredients:
- Butter
- White Sugar
- Eggs
- All-Purpose Flour
- Salt
You will also need a tart pan (the kind with the removable base and fluted edges) as well as a stand mixed. If you don’t have a stand mixer, don’t fret. The crust can be made in a bowl with a hand mixer or even with some elbow grease.
A few pointers and tips:
- Cooling the crust before baking helps ensure a nice and flaky result
- Don’t forget to prick the bottom of the crust with the tines of a fork before baking to prevent it from forming any air bubbles. We want a flaky and thin crust.
- Pie weights are a necessity. If you don’t have pie weights, you can use beans or rice. I keep a jar of old beans that I use and reuse every time I bake a tart or pie shell.
- If the edge of your tart shell is browning too quickly, consider reducing the heat of the oven slightly or you can use some foil to protect the edges of the crust.
- Every oven is different and you’ll need to make adjustments to temperature and timing as you deem appropriate.
- The tart shell needs to be fully cooled before adding the pastry cream.
Making the pastry cream (crème pâtissière)
This pastry cream comes together in one pot and I promise you’ll be eating it by the spoonful. You will need:
- White Sugar
- Corn Starch
- All-Purpose Flour
- Egg Yolks
- Whole Eggs
- Vanilla Extract or Vanilla Paste
- Milk (2% or Whole)
- Whipping Cream (35%)
- Butter
A few pointers and tricks:
- Take your time with the pastry cream. If you try to rush the process you could end up with a grainy and unappetizing result.
- It is best to cook the cream on Low/Medium. A low and slow approach will yield a much smoother and creamier product.
- Sieving the pastry cream is optional but highly recommended as it will remove any larger clumps.
Other ways you can use this pastry cream recipe: filling donuts, filling choux pastry or even on it’s own with ice cream and berries.
Assembling the fresh fruit tart
This is where you let your creativity shine. I’m all about seasonal recipes and ingredents and depending on when I make this recipe, I’ll use what’s available and fresh from the garden or from the market.
For example, if I’m making this tart in June, then it’s strawberries and currants. If I’m making it in July, I’ll use my homegrown plums. August? Then it’s luscious peaches! The tart can also be made in the dead of winter when amazing citrus is available.


Once assembled, the tart should be kept in the fridge and enjoyed within 2-3 days. If you’re making this for a dinner party or special occasion it should be assembled the day of for optimal quality.
Check out the recipe below and let me know if you have any questions in the comments!
Fresh fruit tart with pastry cream
Ingredients
Crust
- ½ cup (115g) Butter – Softened
- ⅓ cup (67g) Sugar – White
- 1 Egg – Large
- 1 ½ cups All-purpose flour – Unbleached preferable
- ¼ teaspoon Salt
Pastry Cream (Creme Patissiere)
- ¾ cups Sugar – White
- 3 Tbsp (45ml) Corn Starch
- 4 tsp (20ml) All-purpose flour
- 4 Egg yolks
- 1 Egg, whole
- 1 teaspoon Vanilla Extract – you can use paste too
- 1 cup Milk – Whole or 2%
- 1 cup Cream – Whipping (35%)
- ¼ cup Butter – Cold
Garnish
- Fresh, seasonal fruits
Instructions
Prepare Crust
- Preheat oven to 400F (200C)
- In the bowl of a stand mixer, add softened butter and sugar. Beat on medium low setting until incorporated and smooth.
- Add egg and continue beating on medium/low setting until incorporated
- With mixer running on low, add flour, salt and continue beating slowly until you get a grainy mixture that comes together when you press it between your fingers
- Place the dough mixture into a 9-inch round tart pan (the kind with the removable bottom). With your fingers, press the mixture down and up the sides until you have full coverage. You can use the bottom of a measuring cup to help you get a nice and flat bottom and even edges.
- Place tart pan in fridge for 30 minutes
- Prick bottom of tart with fork. Bake for 15 minutes with pie weights (I use a mix of old beans as pie weights) on parchment paper.
- After 15 minutes, check the tart shell. Edges should be starting to brown slightly. Take tart out of oven, remove pie weights and parchment, and place back in oven, drop temperature to 350F (175C) for another 10-15 minutes. Tart should be slightly brown and firm to the touch. Every oven is different, so you may need more/less time. Use your judgement.
- Remove tart pan and cool completely on rack
Make Pastry Cream
- In a small saucepan (off the heat), combine sugar, corn starch, flour, egg yolks, egg, and ½ cup of milk. Whisk vigorously to combine.
- Add rest of the milk, cream and vanilla. Whisk to combine and turn on heat to medium. Bring to a boil while constantly whisking. Mixture will begin to thicken. Should take 8-10 minutes.
- When pastry cream bubbles and thickens, drop the head to med-low and continue to cook for another 2 minutes.
- Remove from heat and whisk in cold butter. Butter should be cubed into small pieces and you can add it slowly and whisk whisk whisk!
- Transfer (you can sieve the mixture for a better result – optional) to Pyrex bowl, or stone dish and cover with plastic wrap. Plastic wrap should touch the cream surface so a film does not form.
- Let cool on the counter for 30-60 minutes. Don't cool down completely, you still want it slightly runny.
Assemble Tart
- By now, the tart shell should be cool and the pastry cream should be around room temp. Whisk the pastry cream and then pour it into the shell. With a small offset spatula, spread and level the pastry cream. Place plastic wrap on the tart and refrigerate for at least 2 hours. Now we want the cream to set.
Assemble Tart (continued) – add fruit
- Now you can let your artistic side shine. Decorate the tart with peaches, strawberries, plums, blueberries, mangoes… what ever you like!
Notes
Nutrition
Nutrition information is automatically calculated, so should only be used as an approximation.
 Like this recipe? Rate & comment below!
Did you try this recipe? Let us know what you think! Leave a comment below! And don’t forget to follow us on Facebook and Instagram!


I may be asking a very simple question but I am not familiar with working with a tart tin with removable bottom. Do I release the pastry out of the tart tin after it has cooled and before filling it with pastry cream, or do I remove the tin as soon as I take it from oven while it is still hot?
I prefer to let the crust cool, fill it and garnish it all before unmolding. Unmolding is the last step. I plan to update this blog post this spring with a lot more useful infromation.
I made this a few months ago but I added rum to the cream! Yum!
Love this!