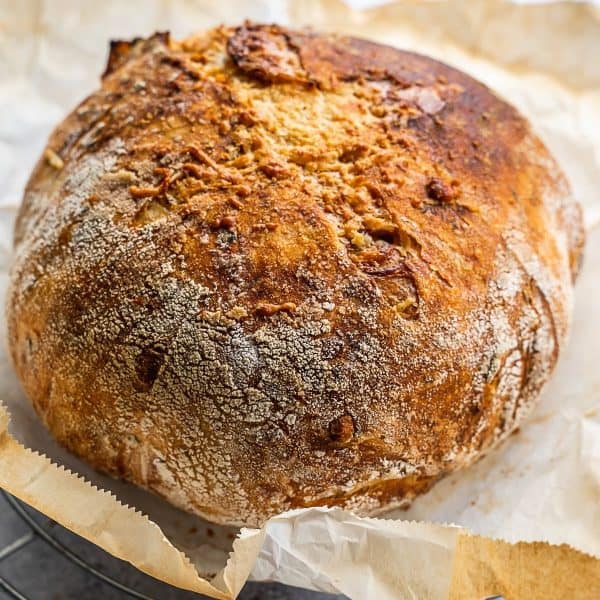
This rosemary parmesan bread is comfort food to the max, and so easy using Jim Lahey’s no-knead overnight method. It’s the simplest way to make bread, and good for absolute beginners.
Try using this bread for a flavorful grilled cheese sandwich with pickled cherry tomatoes, or serve it simply with bread dipping oil. Also try my No Knead Tomato Focaccia, jalapeno cheddar focaccia and No Knead Zaatar Olive Focaccia.

Table of Contents
Ingredients
With only 6 ingredients including water and salt, it’s a simple recipe using easy-to-find ingredients. This bread is made with all-purpose flour rather than bread flour.

- Flour: use plain all-purpose white flour. Whole wheat flour can replace up to 50% the white flour, but the bread will be denser. Or try my No Knead White Bread or No Knead Whole Wheat Bread recipes.
- Parmesan: if you can’t get fresh parmesan, substitute another hard cheese like pecorino. Don’t use the powdered parmesan granules. If you like cheesy baked goods, try my Cheese Fatayer (hand pies) and Cheese Manakish (flatbread).
- Rosemary: this can be fresh or dried, and another herb like thyme can be used in place of rosemary.
See the recipe card for full information on ingredients and quantities.
How to Make No-Knead Bread
A very hands-off recipe, this version doesn’t call for stretching and folding. Just mix, rest overnight, and bake the next day.

1. Mix the dough: add everything but the cheese to a large mixing bowl and stir until a shaggy dough forms (Image 1).
2. Rise: cover and let the dough rise for 12-18 hours, until the surface is dotted all over with bubbles (Image 2).
3. Add the cheese: turn the dough out onto a work surface and press the grated cheese into it (Image 3). Save a couple of tablespoons of cheese for step 7.
4. Form a ball: fold the outer edges in and flip the dough over, forming a ball (Image 4).

5. Transfer to a basket: place the dough seam-side up into a prepared banneton. Rise for another 1-2 hours (Image 5).
6. Bake: preheat a dutch oven, then place the dough into the hot pot. Bake, lid on, for half an hour (Image 6).
7. Bake without the lid: Carefully remove the lid and sprinkle the remaining cheese over the bread and bake for another 15-20 minutes, until golden brown (Image 7).
8. Cool: remove the bread from the oven and cool fully before slicing and serving (Image 8).
How to Store
Storage: this bread can be stored in a paper bag or bread box at room temperature for a couple of days and still taste great. For longer storage, I recommend freezing.
Freezing: freeze either a full or partial loaf, very well wrapped, or cut into slices and freeze that way. For slices, thaw them individually in the toaster for easy single-serve bread.
All About Bannetons
A banneton (affiliate link) is simply a basket that’s specifically meant for bread dough. It’s used for the second prove, or rise, for breads, especially long-ferment breads like no-knead and sourdough. They can be bought in most kitchen stores and online (affiliate link).
If your banneton doesn’t come with a liner, and you’re new to using it, I recommend lining with a coarser weave tea towel in a material like linen. This makes it easier for the bread to release from the basket before baking, because it can get stuck to unseasoned baskets.
You can still make this recipe without a banneton. Use a big enough bowl lined with parchment paper or a floured tea towel instead, and you’ll get a pretty good end result. If you want to bake a lot of crusty breads like this one, though, it’s a good investment to make.


Expert Tips
While this method of bread making is great for beginners and those with less time, there are a few things to keep in mind. Read through the whole post to make sure your rosemary bread turns out perfectly the first time and every time.
- Cool fully: it’s important for any long ferment bread to be fully cooled before slicing, or you’ll get that pilling/rolling that happens when it’s cut too soon.
- Give it time: the dough must rise for at least 12 hours, and can’t be rushed. You’re using a tiny amount of yeast and it needs time to work.
- Use light hands: the dough should be handled lightly, especially when shaping, so the air isn’t knocked out of it.
Recipe FAQs
It’s not necessarily better in terms of bread quality, but it does some of the things that sourdough does. Essentially, the long resting time makes for a more elastic gluten structure and nice end texture, and the amount of work needed is less than kneaded bread.
If your bread is heavy, it probably hasn’t risen (proved) for long enough and the gluten hasn’t developed properly. This method needs patience.
Rosemary is always excellent and a classic choice, but thyme, oregano, and even parsley and basil are great additions to bread.
More Baking Recipes
If you make this Rosemary Parmesan Bread or any other baking recipes on Urban Farm and Kitchen, please take a moment to rate the recipe and leave a comment below. It’s such a help to others who want to try the recipe.
For more Urban Farm and Kitchen, follow along on Instagram, Facebook, and Pinterest, visit the Urban Farm Shop, or subscribe for new posts via email.
No Knead Rosemary Parmesan Bread
Equipment
- Banneton basket (affiliate link) – You can use a bowl instead. See the post above for more information.
Ingredients
- 3 ⅓ cup All-Purpose flour – 430 grams
- 2 tbsp Fresh Rosemary, chopped – or use 1 tbsp dried
- ¼ tsp Instant yeast
- 1 ½ tsp Kosher salt – 8 grams
- 1 ½ cup Water – 345 grams
- ½ cup Parmigiano Reggiano – Coarsely grated
- extra flour or wheat bran for dusting
Instructions
- To a large mixing bowl, add the flour, rosemary, yeast and salt. Mix well to combine. Add the water and stir using a wooden spoon until the flour is hydrated, about 3-4 minutes. The mixture will be sticky, shaggy and rough. That's normal.
- Cover the bowl with plastic wrap and let the mixture rise at room temperature for 12-18 hours. The dough mixture will be dotted with bubbles and will be quite jiggly.
- Transfer the dough to a lightly floured surface like a kitchen counter or large cutting board. Sprinkle most of the grated parmesan (save a couple of tablespoons) all over the surface of the dough. Using your fingers, gently press the parmesan into the dough.
- Form the dough into a tight ball by picking up the edges and folding them upwards. Flip the dough ball so that it is seam side down. Continue to shape the dough ball until you reach the desired shape, but be careful so that you don't deflate it.
- Transfer the dough ball to a floured banneton basket or bowl lined with parchment paper or a clean tea towel, dusted with flour or wheat bran. Place the dough ball seam side up in the baneton or bowl. Cover with a clean tea towel and let it rise for 1-2 hours.
- 30 minutes before the dough is ready, place an oven-safe dutch oven pot in your oven and preheat to 475F. When the oven is preheated and the bread has risen, carefully take out the dutch oven and remove the lid. Flip the dough ball onto a sheet of parchment paper. Pick up the edges of the parchment paper and carefully lower the dough ball into the uncovered dutch oven. Place the lid back on and place the dutch oven back into the oven and bake for 30 minutes.
- After 30 minutes, remove the lid, sprinkle the remaining parmesan on the bread, return to the oven uncovered, and continue to bake for another 15-20 minutes, until a golden brown crust forms.
- Remove the bread from the oven and allow it to cool completely before slicing.
Notes
- Flour: use plain all-purpose white flour. Whole wheat flour can replace up to 50% the white flour, but the bread will be denser.
- Parmesan: if you can’t get fresh parmesan, substitute another hard cheese like pecorino. Don’t use the powdered parmesan granules.
- Rosemary: this can be fresh or dried, and another herb like thyme can be used in place of rosemary.
Nutrition
Nutrition information is automatically calculated, so should only be used as an approximation.
 Like this recipe? Rate & comment below!



Can’t wait to try. Thanks!
I’m not leaving a rating because I haven’t tried the recipe yet, but I want to let you know how clear I found your presentation. I think I could have produced a loaf just from your preliminary outline of the steps. I don’t say this as a criticism of your recipe but as a tribute to the sense of confidence I felt at having a brief overview. Great clarity.
Thank you.
I’m disappointed that the recipe encourages the use of white flour instead of using one or two varieties of whole grains. Understanding nutrition is important for our future and the health of our children.
You are free to use a combination of whole wheat and white flour. You can replace up to 50% of the flour with whole wheat if you like. This was specified in the Substitutions section of the post. You must have missed it. And as an aside, not everything needs to be healthy and nutritious. Sometimes, a little indulgence is ok. Moderation is key. I am not responsible for the health of your children. They are not my children. You, as a parent, are responsible for that and I encourage you to find recipes that work for you and your family. -Luay