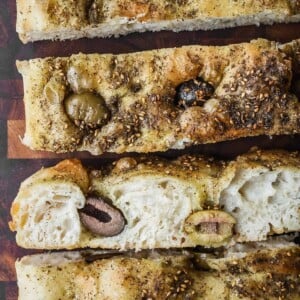
A simple and rewarding No-Knead Olive Za’atar Focaccia Bread recipe that comes together in very little time and with a few simple ingredients. This dough requires an overnight proof, which makes it tastier and easier to digest.
This recipe is an ode to my Palestinian roots and our most important culinary ingredients, za’atar spice blend and olives. Based on my Standard No Knead Focaccia Recipe.

Table of Contents
If you are interested in learning more about Palestinian Recipes and Levantine recipes, especially bread and other baked goods, I recommend trying my za’atar manakish (flatbread), cheese manakish (flatbread), spinach fatayer (handpies), Taboon (Palestinian flatbread), and Lebanese pita bread.
You might also want to check out my other no knead recipes, including fan favorites cherry tomato focaccia, focaccia pizza, no knead white bread, no knead whole wheat bread, jalapeno cheddar focaccia, Fig Onion Cheddar Focaccia, Caramelized Onion Focaccia, and no-knead rosemary parmesan bread.
Also try my Schiacciata (Tuscan flatbread recipe). Baking for one? Try my Small Batch Focaccia in muffin form!
A Beginner Recipe
I know that baking homemade bread can sometimes feel intimidating and out of reach for most. I used to feel this way years ago too. This recipe is perfect for beginners because:
- It doesn’t need any fancy equipment or tools. A large mixing bowl, a wooden spoon, a baking tray and your trusty hands and fingers!
- No fancy techniques are needed here. No sourdough starter to worry about! No slapping or folding of dough! No complicated shaping or scoring.
- It’s very hands-off! The initial mixing is done in 5 minutes. Most of the work happens in the fridge overnight.
Ingredients
This humble focaccia recipe uses standard pantry and fridge ingredients. Za’atar and olives take center stage.

- Flour: This recipe uses 100% white all-purpose flour (unbleached preferred). However, feel free to sub in some whole wheat flour (up to 25% of the total flour amount). You can also use bread flour too. You can use my whole wheat focaccia recipe as a base.
- Yeast: I like to use Instant yeast when making no knead bread, but dry active yeast will work just fine too. Just make sure to bloom it in the water for a few minutes before making the dough. You can also use fresh yeast but do adjust the quantity. When using fresh yeast instead of dry, use double the amount by weight.
- Za’atar: This Middle Eastern spice blend used to be difficult to get and only available at Middle Eastern grocers. Times have changed and you can find it at most grocery stores. You can also make your own za’atar spice mix. There are a few different variations of zaatar such as a Lebanese blend or Palestinian blend. In keeping with the recipe, I suggest using a Palestinian blend. You can also use it in other recipes like my Zaatar manakish, Za’atar garlic knots, bread dipping oil and my Heirloom tomato galette.
- Olives: I like to use cured green olives that have been pitted but feel free to use black olives if that’s what you have.
- Olive oil: I say go all out and use Extra Virgin Olive Oil. In fact, get your hands on some Palestinian olive oil which you can find online or at your local Middle Eastern market.
See the recipe card for full information on ingredients and quantities.
How to make Olive and Za’atar Focaccia

1. Mix. To a large mixing bowl, add the flour, salt, yeast, olive oil and room temperature water (Image 1). Mix with a wooden spoon until all the flour is hydrated. The mix should be shaggy but not sloppy (Image 2).

2. Rise. Drizzle some olive oil over the surface of the dough, cover the bowl with plastic wrap or a tight-fitting cover and refrigerate overnight (Image 3 & Image 4).

3. Deflate and Shape. 2 hours before you want to bake the tomato focaccia, take the bowl out of the fridge and uncover it (Image 5). Using your hands deflate the dough slightly and transfer the dough to an oiled 9×13 baking tray (affiliate link) or sheet pan (Image 6). Shape it loosely by grabbing each end and folding it over like you would a letter. Flip the dough over so the seams are on the bottom (Image 7). Cover the tray with a clean kitchen towel and set aside for 1.5-2 hours (Image 8).

4. Dimple. Preheat your oven. The dough should now have spread covering the surface of the baking tray (Image 9). Drizzle dough with a little more olive oil and start dimpling with your fingers, covering the entire surface. This creates valleys and mountains in the dough and you should also see some air bubbles forming (Image 10).

5. Dress. In a small bowl, combine the za’atar with olive oil to form a loose paste (Image 11). Drizzle the za’atar paste all over the dough (Image 12). It doesn’t have to be covered evenly. Trust your gut and go with the flow. Nestle in a handful of olives (Image 13). Remember, less is more.
6. Bake. Bake in the preheated oven for 20-25 minutes, until golden brown (Image 14).
Za’atar Focaccia Video Tutorial
Expert Tips
- Don’t Hurry the process. Allow the dough to rise in the fridge for at least 18 hours and you’ll need 2-4 hours for the second rise depending on how warm or cold your kitchen is. That being said, make sure to plan ahead!
- Parchment paper: Line your baking sheet or baking pan with parchment paper for easy cleanup. Don’t use aluminum foil as it will stick to the bottom of the bread!
- Skip the dough altogether: I get it. Sometimes we need a quick fix. You can make this recipe with store-bought pizza dough or bread rolls.
- Short on time? Make the dough in a stand mixer with a dough hook attachment and knead on medium speed for 6-8 minutes. Let the dough rise for 1 hour and then proceed with the baking steps. The focaccia may bake up a little flatter than expected but it will still be tasty.
- Let it cool slightly! Don’t cut into the piping hot focaccia right away after it’s finished baking. If you cut too soon, the steam can make the dough gummy. Let it cool for at least 30 minutes first. I know it’s hard, but trust me, it’ll be worth the wait.

Recipe FAQs
This is the ultimate make-ahead recipe because you can prepare the focaccia dough and refrigerate it for up to 2 days.
Once baked, you can store leftover focaccia in an airtight container on the counter for up to 2 days. To extend its life, you can refrigerate it for 2 more days. I suggest you enjoy this za’atar focaccia soon after it has been baked.
Palestinian zaatar typically consists of a blend of dried thyme, sesame seeds, sumac, and salt. The exact proportions of these ingredients can vary, and some variations may include additional herbs or spices depending on personal preferences and regional differences.
The slow fermentation process in the overnight proofing allows the enzymes in the dough to break down complex carbohydrates and gluten, making the bread easier to digest. This can be especially beneficial for individuals with gluten sensitivities.
While slow-rising bread does not become completely gluten-free, the prolonged fermentation process can break down some of the gluten proteins. For individuals with mild gluten sensitivities, this might make slow-rising bread more tolerable compared to bread made with quick-rise yeasts.
Other Baking Recipes
If you make this No-Knead Olive Za’atar Focaccia Bread or any other baking recipe on Urban Farm and Kitchen, please take a moment to rate the recipe ⭐⭐⭐⭐⭐ and leave a comment below. It’s such a help to others who want to try the recipe.
For more Urban Farm and Kitchen, follow along on Instagram, Facebook, and Pinterest, visit the Urban Farm Shop, or subscribe for new posts via email.
No-Knead Olive Za’atar Focaccia Bread
Equipment
- 9×13 Baking pan or large rimmed baking sheet – Affiliate link
Ingredients
For the Dough
- 4 cups All-purpose flour – 520 grams – Bread flour can also be used
- 2 tsp Kosher salt – 10 grams
- 2 tsp Instant yeast – 7 grams
- 2 tbsp Extra virgin olive oil – 28 grams
- 2 cups Lukewarm water – 473 grams
- Extra olive oil for drizzling
For Baking and Garnish
- 1 tbsp Butter – Optional
- ¼ cup Extra virgin olive oil, divided – for greasing the tray and for mixing with zaatar
- 3 tbsp Za'atar spice blend
- 1 cup Pitted whole green and/or black olives
Instructions
- Mix. To a large bowl, add 4 cups All-purpose flour, 2 tsp Kosher salt, 2 tsp Instant yeast, 2 tbsp Extra virgin olive oil and 2 cups Lukewarm water. Mix with a wooden spoon until all the flour is hydrated. The mix should be shaggy but not sloppy.
- Rise. Drizzle some olive oil over the top of the dough, cover the bowl with plastic wrap or a tight-fitting cover and refrigerate overnight at least 18 hours.
- Deflate and shape. At least 2 hours before you want to bake the focaccia, take the bowl out of the fridge and uncover it. Prepare your baking pan by buttering it, and drizzling about 1-2 tablespoons of olive oil. Using your hands or a dough scraper deflate the dough slightly and transfer the dough to the prepared baking pan. Shape it loosely by grabbing each end and folding it over like you would a letter. Flip the dough over so the seams are on the bottom. Cover the tray with a towel and set aside for 1.5-2 hours.
- Dimple. Preheat your oven to 425F/220C. The dough should now have spread covering the surface of the baking tray. If not, you can help it stretch to the edges by carefully easing it to the corners. Drizzle more olive oil over the dough and start dimpling with your fingers, covering the entire surface. This creates valleys and mountains in the dough and you should also see air bubbles forming.
- Dress. In a small bowl, combine 3 tbsp Za'atar spice blend with 2 tablespoons olive oil to form a loose paste. Drizzle the za’atar paste all over the dough. It doesn’t have to be covered evenly. Trust your gut and go with the flow. Nestle in a handful of olives. Remember, less is more.
- Bake. Bake in the preheated oven for 20-25 minutes, until golden brown. Every oven is different, so your focaccia may need more time.
Video
Notes
- Don’t Hurry the process. Allow the dough to rise in the fridge for at least 18 hours and you’ll need 2-4 hours for the second rise. The timing will depend on the temperature in your kitchen and how active the dough is. Plan ahead!
- This recipe uses Instant yeast. But if you only have active dry yeast, you can bloom it in warm water with the sugar for 5 minutes. Once bubbly, you can add the yeast mixture to the rest of the dough’s dry ingredients.
- This is a high-hydration recipe, meaning the dough will be quite loose. This is why you have to bake the focaccia on a rimmed baking sheet or tray.
Nutrition
Nutrition information is automatically calculated, so should only be used as an approximation.
 Like this recipe? Rate & comment below!


This was amazing…this is the focaccia of dreams. Thank you for the share!0
Glad you like it! -Luay
Easy to follow recipe and so good with the olives. Also made the Za’atar blend from the website. Definitely recommend.
Glad you liked it!